
 Sign In
 Create Account
Welcome to Card Game DB
Register now to gain access to all of our features. Once registered and logged in, you will be able to create topics, post replies to existing threads, give reputation to your fellow members, get your own private messenger, post status updates, manage your profile and so much more. If you already have an account, login here - otherwise create an account for free today!
Register now to gain access to all of our features. Once registered and logged in, you will be able to create topics, post replies to existing threads, give reputation to your fellow members, get your own private messenger, post status updates, manage your profile and so much more. If you already have an account, login here - otherwise create an account for free today!
Return to the Dunwich Legacy
Spoiler Protection:
?


0 Comments
House in the Reeds
Type: Location
Encounter Set: Return to Blood on the Altar
Dunwich.
While you are in the House in the Reeds, you cannot play assets.
[Free] If there are no clues here: Draw the encounter card underneath House in the Reeds. (Group limit once per game.)
[Free] If there are no clues here: Draw the encounter card underneath House in the Reeds. (Group limit once per game.)
Even the locals stay away from this half-sunken hovel.
Quantity: 1
Number: 38
Illustrator: Dimitri Bielak

0 Comments
Idle Hands
Type: Treachery
Encounter Set: Erratic Fear
Terror.
Revelation – Put Idle Hands into play in your threat area.
[Free] If Idle Hands is in your threat area, during your turn, take 2 damage and discard Idle Hands: You may take an additional action this turn.
Forced – At the end of your turn: Take 1 horror.
[Free] If Idle Hands is in your threat area, during your turn, take 2 damage and discard Idle Hands: You may take an additional action this turn.
Forced – At the end of your turn: Take 1 horror.
Quantity: 2
Number: 69
Illustrator: Romana Kendelic

0 Comments
Imperceptible Creature
Type: Treachery
Encounter Set: Return to Undimensioned and Unseen
Power.
Surge.
Revelation – Attach to a Brood of Yog-Sothoth enemy in play without a copy of Imperceptible Creature attached. Remove 2 clues from that enemy.
Attached enemy gains Elite.
Revelation – Attach to a Brood of Yog-Sothoth enemy in play without a copy of Imperceptible Creature attached. Remove 2 clues from that enemy.
Attached enemy gains Elite.
“It’s invisible—I knew it would be...â€
—H. P. Lovecraft, “The Dunwich Horrorâ€
Quantity: 2
Number: 46
Illustrator: Matthew Cowdery

0 Comments
Indecipherable Stairs
Type: Location
Encounter Set: Return to Lost in Time and Space
Otherworld. Extradimensional.
Revelation – Put Indecipherable Stairs into play and discard the top 3 cards of your deck.
Forced – After you leave Indecipherable Stairs: You must either take 2 horror, or discard Indecipherable Stairs.
Forced – After you leave Indecipherable Stairs: You must either take 2 horror, or discard Indecipherable Stairs.
Quantity: 1
Number: 58
Illustrator: Nele Diel

0 Comments
Inexplicable Cold
Type: Treachery
Encounter Set: Creeping Cold
Hazard.
Revelation – Test [Agility] (4). For each point you fail by, you must either choose and discard 1 card from your play area or from your hand, or take 1 damage.
Quantity: 2
Number: 66
Illustrator: Arden Beckwith

0 Comments
Infinite Doorway
Type: Treachery
Encounter Set: Beyond the Threshold
Hex.
Revelation – Attach to your location.
As an additional cost to move into or out of attached location, discard the top card of your deck. If the discarded card is a weakness, draw it. Otherwise, for each copy of the discarded card in your hand or play area, you must either take 1 horror or discard that card.
As an additional cost to move into or out of attached location, discard the top card of your deck. If the discarded card is a weakness, draw it. Otherwise, for each copy of the discarded card in your hand or play area, you must either take 1 horror or discard that card.
Quantity: 2
Number: 63
Illustrator: Robert Laskey


0 Comments
Into the Beyond (v. II)
Type: Act
Encounter Set: Return to Lost in Time and Space
Clue Threshold: –
[Action]: Discard the top 3 cards of the encounter deck. Choose a location discarded by this effect and resolve its ‘revelation’ ability.
Objective – If an investigator enters The Edge of the Universe, advance.
Objective – If an investigator enters The Edge of the Universe, advance.
You reach an impossibly dense, pitch-black void, and you realize that this place is where all of reality—all that is and all that ever will be—ends. In its center, you see a minuscule rift, suspended just out of reach. Somehow, you’ve reached the other side of the gateway above Sentinel Hill.
Just then, a voice from the darkness beyond calls to you. “Git out.” The wisp of light you’ve been following flits into the darkness. Moments later, the warped, twisted face of Seth Bishop emerges. His skin crawls with an unnatural mutation. His eyes are wide, filled with a wicked malice. “Git out! I am His vessel now! I ’ave the knowledge of the elders! Now, leave…or die!” He cackles madly as his enthralled, misshapen body limps forward.
You must find a way to close the rift for good, but first, you must deal with Seth—that is, with the creature he has become.
Spawn the set-aside Seth Bishop (Thrall of Yog-Sothoth) enemy at The Edge of the Universe.
You continue to follow the wisp of light, though the treacherous landscape makes it a difficult quarry to chase.
Quantity: 1
Number: 55
Illustrator: Ethan Patrick Harris

0 Comments
Naomi O’Bannion
Type: Asset
Class:
Cost: 5
Level: 0
Willpower: 0
Intellect: 2
Combat: 2
Agility: 0
Wild: 0
Health: 3
Sanity: 3
Slot: Ally
Ally. Criminal. Syndicate.
You get +1 [Intellect] and +1 [Combat].
[Reaction] When an investigator at your location reveals a non-[Auto-fail] chaos token during an [Intellect] or [Combat] test, exhaust Naomi O’Bannion: Cancel that chaos token and reveal a new chaos token. For the remainder of this test, if another copy of the canceled chaos token is revealed, cancel it and reveal a new chaos token.
[Reaction] When an investigator at your location reveals a non-[Auto-fail] chaos token during an [Intellect] or [Combat] test, exhaust Naomi O’Bannion: Cancel that chaos token and reveal a new chaos token. For the remainder of this test, if another copy of the canceled chaos token is revealed, cancel it and reveal a new chaos token.
Quantity: 1
Number: 52
Illustrator: Alexandre Dainche

0 Comments
Seth Bishop
Type: Enemy
Encounter Set: Return to Lost in Time and Space
Fight: 5
Health: 4
Evade: 5
Damage: 1
Horror: 1
Victory: 2
Humanoid. Monster. Abomination. Elite.
Retaliate.
Forced – When Seth Bishop attacks you during the enemy phase: Either move to Another Dimension after this attack, or Seth Bishop deals +2 damage for this attack.
Forced – After Yog-Sothoth enters Seth Bishop’s location (or vice versa): Seth is devoured whole. Remove Seth Bishop from the game and heal 6 damage from Yog-Sothoth.
Quantity: 1
Number: 56
Illustrator: Rafał Hrynkiewicz

0 Comments
Need for Knowledge
Type: Treachery
Encounter Set: Erratic Fear
Terror.
Revelation – If you have no clues, Need for Knowledge gains surge. Otherwise, test [Intellect] (X), where X equals the number of clues you have (to a maximum of 5). For each point you fail by, you must either take 1 horror or place 1 of your clues on your location.
Quantity: 3
Number: 70
Illustrator: Roberto Ricci

0 Comments
Night Beyond Void
Type: Treachery
Encounter Set: Return to The Miskatonic Museum
Victory: 0
Power.
Revelation – Place 1 resource on Shadow-spawned, even if it is out of play.
All was blackness beneath as the fluttering legions surged northward amidst rushing winds and invisible laughter in the aether…
– H. P. Lovecraft, The Dream Quest of Unknown Kadath
Quantity: 2
Number: 24
Illustrator: Alexander Kozachenko
0 Comments
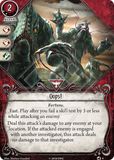
Oops!
Type: Event
Class: Survivor
Cost: 2
Level: 2
Willpower: 0
Intellect: 0
Combat: 2
Agility: 1
Wild: 0
Fortune.
Fast. Play after you fail a skill test by 3 or less while attacking an enemy.
Deal this attack’s damage to any enemy at your location. If the attacked enemy is engaged with another investigator, this attack deals no damage to that investigator.
Deal this attack’s damage to any enemy at your location. If the attacked enemy is engaged with another investigator, this attack deals no damage to that investigator.
Quantity: 2
Number: 9
Illustrator: Mariusz Gandzel

0 Comments
Oppressive Mists
Type: Treachery
Encounter Set: Creeping Cold
Hazard.
Revelation – Attach to your location. Limit 1 per location.
Forced – After an investigator at this location draws 1 or more cards, that investigator must test [Willpower] (3). If that investigator fails, he or she chooses and discards an equal number of cards.
[Action] [Action]: Discard Oppressive Mists.
Forced – After an investigator at this location draws 1 or more cards, that investigator must test [Willpower] (3). If that investigator fails, he or she chooses and discards an equal number of cards.
[Action] [Action]: Discard Oppressive Mists.
Quantity: 2
Number: 67
Illustrator: Stanislav Dikolenko


0 Comments
Osborn’s General Store
Type: Location
Encounter Set: Return to Blood on the Altar
Dunwich.
Forced – After you reveal Osborn’s General Store: Gain 2 resources.
[Free] If there are no clues here: Draw the encounter card underneath Osborn’s General Store. (Group limit once per game.)
[Free] If there are no clues here: Draw the encounter card underneath Osborn’s General Store. (Group limit once per game.)
From the air of hushed fright at Osborn’s store they knew something hideous had happened... –H. P. Lovecraft, “The Dunwich Horrorâ€
Quantity: 1
Number: 36
Illustrator: Mark Molnar

0 Comments
Preposterous Sketches
Type: Event
Class: Seeker
Cost: 0
Level: 2
Willpower: 1
Intellect: 1
Combat: 0
Agility: 0
Wild: 0
Insight.
Play only if there is a clue on your location.
Draw 3 cards.
Draw 3 cards.
Quantity: 2
Number: 3
Illustrator: German Nobile

0 Comments
Raise the Stakes
Type: Treachery
Encounter Set: Return to The House Always Wins
Illicit.
Revelation – You must (choose one):
—Remember that you have “cheated.”
—Lose 5 resources.
—Put Raise the Stakes into play in your threat area. It gains: “Each Criminal enemy at your location loses aloof. If it is Act 2 or 3, each Criminal enemy engaged with you gets +1 fight and +1 evade.”
—Remember that you have “cheated.”
—Lose 5 resources.
—Put Raise the Stakes into play in your threat area. It gains: “Each Criminal enemy at your location loses aloof. If it is Act 2 or 3, each Criminal enemy engaged with you gets +1 fight and +1 evade.”
Quantity: 2
Number: 19
Illustrator: Bryce Cook

0 Comments
Realms Beyond
Type: Location
Encounter Set: Return to Lost in Time and Space
Otherworld.
Yog-Sothoth is immune to player card effects, cannot take damage, and cannot leave Realms Beyond.
As an additional cost for you to leave Realms Beyond, test [Willpower] or [Agility] (3). If you fail, cancel the effects of the move.
Forced – When a forced effect would move an investigator or enemy to Another Dimension: Move them here, instead. Cannot be canceled.
As an additional cost for you to leave Realms Beyond, test [Willpower] or [Agility] (3). If you fail, cancel the effects of the move.
Forced – When a forced effect would move an investigator or enemy to Another Dimension: Move them here, instead. Cannot be canceled.
Quantity: 1
Number: 57
Illustrator: Alexandr Elichev

0 Comments
Resurgent Evils
Type: Treachery
Encounter Set: Resurgent Evils
Omen.
Peril.
Revelation – You must either (choose one):
—Draw the top 2 cards of the encounter deck.
—Place 1 doom on the current agenda (this effect can cause the current agenda to advance).
Revelation – You must either (choose one):
—Draw the top 2 cards of the encounter deck.
—Place 1 doom on the current agenda (this effect can cause the current agenda to advance).
Quantity: 3
Number: 64
Illustrator: Anders Finér


0 Comments
Return to Blood on the Altar
Type: Scenario
Encounter Set: Return to Blood on the Altar
Perform the setup as indicated in the Dunwich Legacy Campaign Guide, with the following exceptions:
● When gathering encounter sets, also gather the new encounter set for Return to Blood on the Altar shown here.
[ICONS: New Return to Blood on the Altar icon, new Impeding Doom icon]
● Set each copy of Hired Gun aside, out of play.
● Remove the original Village Commons location from the game and replace it with the new Village Commons (Silent Decay).
(Continued on reverse side.)
● Add the new locations to the original locations from the Blood on the Altar encounter set. Remove 1 of the 3 copies of each of these locations from the game at random. Then, choose 1 of the 6 remaining locations at random and remove it from the game as well. Put the remaining locations into play.
● When placing encounter cards underneath locations, do not include the 6 cards from the Naomi’s Crew encounter set.
● Check Campaign Log. If the O’Bannion gang has a bone to pick with the investigators: Spawn one set-aside Hired Gun at one of the locations not connected to Village Commons. Shuffle the other set-aside Hired Gun into the encounter deck.
Quantity: 1
Number: 32a
Illustrator: —————


0 Comments
Return to Extracurricular Activities
Type: Scenario
Encounter Set: Return to Extracurricular Activities
Perform the setup as indicated in the Dunwich Legacy Campaign Guide, with the following exceptions:
● When gathering encounter sets, also gather the new encounter sets for Return to Extracurricular Activities shown here.
[ICONS: New Return to Extracurricular Activities icon, The Beyond is replaced with Beyond the Threshold, Ancient Evils is replaced with Resurgent Evils, Locked Doors is replaced with Secret Doors, Agents of Yog-Sothoth is replaced with Yog-Sothoth’s Emissaries]
(Continued on reverse side.)
● Randomly choose between Orne Library and Warren Observatory. Put the chosen location into play, along with the rest of the starting locations. Remove the other location from the game.
● If you have completed Return to The House Always Wins, search the gathered encounter sets for 1 copy of Enthralled Security Guard, and spawn it at the Administration Building.
————————————————
For the duration of this scenario, the following additional rule applies: “Anytime a scenario card effect discards 1 or more weaknesses from the top of your deck, you must draw those cards.” Attach this card to the scenario reference card as a reminder.
Quantity: 1
Number: 12a
Illustrator: —————


0 Comments
Return to Lost in Time and Space
Type: Scenario
Encounter Set: Return to Lost in Time and Space
Perform the setup as indicated in the Dunwich Legacy Campaign Guide, with the following exceptions:
● When gathering encounter sets, also gather the new encounter set for Return to Lost in Time and Space shown here.
[ICONS: New Return to Lost and Time and Space icon, Agents of Yog-Sothoth is replaced with Yog-Sothoth’s Emissaries, The Beyond is replaced with Beyond the Threshold]
● Set Seth Bishop (Thrall of Yog-Sothoth) aside, out of play.
● Check Campaign Log. If the Ritual was completed: Replace Act 2a—“Into the Beyond” with the new Act 2a—“Into the Beyond (v. II)” included in this encounter set.
● Replace Agenda 3a—“Breaking Through” with the new Agenda 3a—“Breaking Through (v. II)” included in this encounter set.
● Put the single-sided Realms Beyond location into play and spawn Yog‑Sothoth there.
● Replace Agenda 3a—“Breaking Through” with the new Agenda 3a—“Breaking Through (v. II)” included in this encounter set.
● Put the single-sided Realms Beyond location into play and spawn Yog‑Sothoth there.
Quantity: 1
Number: 53a
Illustrator: —————


0 Comments
Return to The Essex County Express
Type: Scenario
Encounter Set: Return to The Essex County Express
Perform the setup as indicated in the Dunwich Legacy Campaign Guide, with the following exceptions:
● When gathering encounter sets, also gather the new encounter set for Return to The Essex County Express shown here.
[ICONS: New Return to the Essex County Express icon, The Beyond is replaced with Beyond the Threshold, Ancient Evils is replaced with Resurgent Evils, Striking Fear is replaced with Erratic Fear]
(Continued on reverse side.)
● Remove Agenda 1a—“A Tear in Reality” from the game and replace it with the new Agenda 0a—“Where There’s Smoke” and the new Agenda 1a— “A Tear in Reality (v. II).” (When you construct the agenda deck, agenda 0a should be on top.)
● When choosing 6 Train Car locations to put into play at random, include the 2 new Train Car locations in this encounter set, for a total of 10 possible cards.
● When choosing an Engine Car location to put into play at random, include the new Engine Car location in this encounter set, for a total of 4 possible cards.
● Set the Engineer story asset aside, out of play.
Quantity: 1
Number: 25a
Illustrator: —————


0 Comments
Return to The House Always Wins
Type: Scenario
Encounter Set: Return to The House Always Wins
Perform the setup as indicated in the Dunwich Legacy Campaign Guide, with the following exceptions:
● When gathering encounter sets, also gather the new encounter set for Return to The House Always Wins shown here.
[ICONS: New Return to the House Always Wins icon, Striking Fear is replaced with Erratic Fear]
(Continued on reverse side.)
● When gathering encounter sets, also gather the new encounter set for Return to The House Always Wins shown here.
[ICONS: New Return to the House Always Wins icon, Striking Fear is replaced with Erratic Fear]
(Continued on reverse side.)
● Set Clover Club Stage aside, out of play.
● Choose one of the two Clover Club Lounge locations at random. Put the chosen locations into play along with the rest of the starting location. Remove the other version of Clover Club Lounge from the game.
● Choose one of the two Clover Club Lounge locations at random. Put the chosen locations into play along with the rest of the starting location. Remove the other version of Clover Club Lounge from the game.
Quantity: 1
Number: 15a
Illustrator: —————


0 Comments
Return to The Miskatonic Museum
Type: Scenario
Encounter Set: Return to The Miskatonic Museum
Perform the setup as indicated in the Dunwich Legacy Campaign Guide, with the following exceptions:
● When gathering encounter sets, also gather the new encounter set for Return to The Miskatonic Museum shown here.
[ICONS: New Return to the Miskatonic Museum icon, The Beyond is replaced with Beyond the Threshold, Chilling Cold is replaced with Creeping Cold, Locked Doors is replaced with Secret Doors]
(Continued on reverse side.)
● Before creating the “Exhibit Deck,” add the 2 new Exhibit Hall locations to the original 6 Exhibit Hall locations. Set Exhibit Hall (Restricted Hall) aside and randomly remove 2 Exhibit Hall locations from the game. Then, continue creating the Exhibit Deck as normal.
————————————————
For the duration of this scenario, the following additional rule applies:
“While an investigator is resolving the text on agenda 1b and agenda 2b, the Forced ability on the next agenda in the agenda deck is considered to be active.”
Attach this card to the scenario reference card as a reminder.
Quantity: 1
Number: 20a
Illustrator: —————


0 Comments
Return to Undimensioned and Unseen
Type: Scenario
Encounter Set: Return to Undimensioned and Unseen
Perform the setup as indicated in the Dunwich Legacy Campaign Guide, with the following exceptions:
● When gathering encounter sets, also gather the new encounter set for Return to Undimensioned and Unseen shown here.
[ICONS: New Return to Undimensioned and Unseen icon, Striking Fear is replaced with Erratic Fear]
(Continued on reverse side.)
● When gathering encounter sets, also gather the new encounter set for Return to Undimensioned and Unseen shown here.
[ICONS: New Return to Undimensioned and Unseen icon, Striking Fear is replaced with Erratic Fear]
(Continued on reverse side.)
● Remove 4 copies of Brood of Yog‑Sothoth from the original scenario and replace them with the 4 new versions of Brood of Yog-Sothoth from the Return to Undimensioned and Unseen encounter set.
————————————————
For the duration of this scenario, the following additional rule applies:
“If a Brood of Yog-Sothoth would be put into play, it is chosen at random from among the set-aside versions of Brood of Yog‑Sothoth.”
Attach this card to the scenario reference card as a reminder.
————————————————
For the duration of this scenario, the following additional rule applies:
“If a Brood of Yog-Sothoth would be put into play, it is chosen at random from among the set-aside versions of Brood of Yog‑Sothoth.”
Attach this card to the scenario reference card as a reminder.
Quantity: 1
Number: 41a
Illustrator: —————


0 Comments
Return to Where Doom Awaits
Type: Scenario
Encounter Set: Return to Where Doom Awaits
Perform the setup as indicated in the Dunwich Legacy Campaign Guide, with the following exceptions:
● When gathering encounter sets, also gather the new encounter set for Return to Where Doom Awaits shown here.
[ICONS: New Where Doom Awaits icon, Striking Fear is replaced with Erratic Fear, Chilling Cold is replaced with Creeping Cold, Ancient Evils is replaced with Resurgent Evils]
● Set Naomi O’Bannion aside, out of play.
(Continued on reverse side)
● Replace the original Base of the Hill and Ascending Path with the new Base of the Hill (Warped and Twisted) and Ascending Path (Warped and Twisted).
● Add the new Diverging Path and Altered Path to the original Diverging Paths and Altered Paths. Then, randomly remove 1 of each from the game. (You will remove an additional copy of each during standard setup.)
● Check Campaign Log. If Naomi has your back: Instead of gaining clues from the token bank via the effect from Part 1 in the Campaign Guide, the lead investigator may choose an investigator to add the set-aside Naomi O’Bannion to his or her deck. This card does not count toward that investigator’s deck size.
Quantity: 1
Number: 47a
Illustrator: —————

0 Comments
Rise to the Occasion
Type: Skill
Class: Survivor
Level: 3
Willpower: 0
Intellect: 0
Combat: 0
Agility: 0
Wild: 2
Innate.
Commit only to a skill test you are performing, and only if the difficulty of that test is higher than your base skill value.
Rise to the Occasion gets +X ? icons, where X is the difference between your base skill and this test’s difficulty (to a maximum of +3 ? icons).
Rise to the Occasion gets +X ? icons, where X is the difference between your base skill and this test’s difficulty (to a maximum of +3 ? icons).
Quantity: 2
Number: 10
Illustrator: Clark Huggins

0 Comments
Rite of Seeking
Type: Asset
Class: Mystic
Cost: 4
Level: 2
Willpower: 0
Intellect: 1
Combat: 0
Agility: 0
Wild: 0
Slot: 1 Arcane
Spell.
Uses (3 charges).
[Action] Spend 1 charge: Investigate. Investigate using [Willpower] instead of [Intellect]. You get +2 [Willpower] for this test. If you succeed, you discover 1 additional clue at this location. If a [Skull], [Cultist], [Tablet], [Elder Thing], or [Auto-fail] symbol is revealed during this test, after this test resolves lose all remaining actions and immediately end your turn.
[Action] Spend 1 charge: Investigate. Investigate using [Willpower] instead of [Intellect]. You get +2 [Willpower] for this test. If you succeed, you discover 1 additional clue at this location. If a [Skull], [Cultist], [Tablet], [Elder Thing], or [Auto-fail] symbol is revealed during this test, after this test resolves lose all remaining actions and immediately end your turn.
Quantity: 2
Number: 7
Illustrator: Romana Kendelic


0 Comments
Schoolhouse
Type: Location
Encounter Set: Return to Blood on the Altar
Dunwich.
Forced – After you discover a clue from this location: Search the encounter deck and discard pile for a copy of Servant of Many Mouths and draw it. Shuffle the encounter deck.
[Free] If there are no clues here: Draw the encounter card underneath Schoolhouse. (Group limit once per game.)
[Free] If there are no clues here: Draw the encounter card underneath Schoolhouse. (Group limit once per game.)
With its crumbling rooftop and rat-infested walls, this is hardly even a house, let alone a schoolhouse.
Quantity: 1
Number: 39
Illustrator: Mark Molnar

0 Comments
Secret Door
Type: Treachery
Encounter Set: Secret Doors
Obstacle.
Revelation – Attach to the location with the most investigators, and without a Secret Door attached.
Investigators cannot leave this location.
[Action]: Test [Willpower] (3) to search for the passage or [Intellect] (3) to discern the way out. If you succeed, discard Secret Door.
Investigators cannot leave this location.
[Action]: Test [Willpower] (3) to search for the passage or [Intellect] (3) to discern the way out. If you succeed, discard Secret Door.
Quantity: 2
Number: 65
Illustrator: Robert Laskey

