
 Sign In
 Create Account
Welcome to Card Game DB
Register now to gain access to all of our features. Once registered and logged in, you will be able to create topics, post replies to existing threads, give reputation to your fellow members, get your own private messenger, post status updates, manage your profile and so much more. If you already have an account, login here - otherwise create an account for free today!
Register now to gain access to all of our features. Once registered and logged in, you will be able to create topics, post replies to existing threads, give reputation to your fellow members, get your own private messenger, post status updates, manage your profile and so much more. If you already have an account, login here - otherwise create an account for free today!
Return to the Forgotten Age
Spoiler Protection:
?


0 Comments
The Chthonian Stone
Type: Asset
Class: Mystic
Cost: 2
Level: 3
Wild: 0
Slot: 1 Hand
Item. Relic. Cursed.
Seal ([Skull], [Cultist], [Tablet], or [Elder Thing]). Uses (3 charges). If The Chthonian Stone has no charges, return it to your hand.
Forced – After you reveal an [Auto-fail] symbol during a skill test: Remove 1 charge from The Chthonian Stone.
Forced – After you reveal an [Auto-fail] symbol during a skill test: Remove 1 charge from The Chthonian Stone.
Quantity: 2
Number: 8
Illustrator: Matt Zeilinger

0 Comments
Veda Whitsley
Type: Asset
Class: Neutral
Cost: 1
Level: 0
Wild: 2
Health: 3
Sanity: 3
Slot: Ally
Ally. Wayfarer.
[Free] Exhaust Veda Whitsley: Look at the top card of the exploration deck or encounter deck. If it is an enemy, you may deal 1 damage to Veda Whitsley to discard it. If it is a treachery, you may deal 1 horror to Veda Whitsley to discard it. Otherwise, return it to the top of its deck.
Quantity: 1
Number: 37
Illustrator: Aleksander Karcz

0 Comments
Merging Timelines
Type: Treachery
Encounter Set: Temporal Hunters
Hex.
Revelation – Discard the top 5 cards of your deck. For each card in your hand that matches one of the discarded cards (by title), discard that card from your hand and lose 1 action. Shuffle each weakness discarded by this effect into your deck.
Quantity: 3
Number: 76
Illustrator: Nele Diel


0 Comments
Metropolitan Cathedral
Type: Location
Encounter Set: Return to The Boundary Beyond
Mexico City. Present-day.
[Action] Take 1 horror: Gain 2 resources.
[Action] If you have 10 or more resources: Explore. Draw the top card of the exploration deck. If it is a location with a matching location symbol in the upper-left corner, place it on top of this location, taking its place.
[Action] If you have 10 or more resources: Explore. Draw the top card of the exploration deck. If it is a location with a matching location symbol in the upper-left corner, place it on top of this location, taking its place.
The Catedral Metropolitana, situated on the northern side of the Plaza de la Constitución, was built by conquistadors after the conquest of the Aztec Empire. Cloud wisps swirl eerily over each of the cathedral’s bell towers.
Quantity: 1
Number: 40
Illustrator: Nele Diel

0 Comments
Mists of R’lyeh
Type: Asset
Class: Mystic
Cost: 2
Level: 2
Wild: 0
Slot: 1 Arcane
Spell.
Uses (5 charges).
[Action] Spend 1 charge: Evade. This evasion attempt uses [Willpower] instead of [Agility]. You get +1 [Willpower] for this evasion attempt. If you succeed, after evading the chosen enemy, you may move to a connecting location. If a [Skull], [Cultist], [Tablet], [Elder Thing], or [Auto-fail] symbol is revealed during this evasion attempt, choose and discard a card from your hand.
[Action] Spend 1 charge: Evade. This evasion attempt uses [Willpower] instead of [Agility]. You get +1 [Willpower] for this evasion attempt. If you succeed, after evading the chosen enemy, you may move to a connecting location. If a [Skull], [Cultist], [Tablet], [Elder Thing], or [Auto-fail] symbol is revealed during this evasion attempt, choose and discard a card from your hand.
Quantity: 2
Number: 7
Illustrator: Justin Adams

0 Comments
Mosaic Chamber
Type: Location
Encounter Set: Return to The Doom of Eztli
Ancient. Ruins.
[Action] Check your supplies. If you have a canteen: The chamber accepts your gift of water. Remove 1 doom from any location in play. (Group limit once per game.)
Quantity: 1
Number: 21
Illustrator: Yoann Boissonnet

0 Comments
Offer You Cannot Refuse
Type: Treachery
Encounter Set: Basic Weakness
Pact.
Campaign Mode only.
When you become the bearer of this weakness, gain 2 experience.
Revelation – Lose 5 resources. If you cannot, instead remove Offer You Cannot Refuse from your deck, search the collection for Fine Print, and place it in your discard pile.
When you become the bearer of this weakness, gain 2 experience.
Revelation – Lose 5 resources. If you cannot, instead remove Offer You Cannot Refuse from your deck, search the collection for Fine Print, and place it in your discard pile.
Quantity: 1
Number: 13
Illustrator: Andreas Zafiratos

0 Comments
On Your Own
Type: Asset
Class: Survivor
Cost: –
Level: 3
Wild: 0
Talent.
Exceptional. Permanent.
Your investigator gains: “Deckbuilding Restrictions: No assets that take up an ally slot.”
[Reaction] When you play a [Survivor] event, exhaust On Your Own: Reduce that event’s cost by 2.
Your investigator gains: “Deckbuilding Restrictions: No assets that take up an ally slot.”
[Reaction] When you play a [Survivor] event, exhaust On Your Own: Reduce that event’s cost by 2.
Quantity: 1
Number: 10
Illustrator: Alexander Kozachenko

0 Comments
Perils of Yoth
Type: Treachery
Encounter Set: Return to The Depths of Yoth
Hazard.
Peril.
Revelation – You must either (choose one):
● Set Perils of Yoth aside, out of play. (This exploration fails.)
● Set Perils of Yoth aside, out of play; take horror or damage equal to the current depth level; and continue exploring as if you had not drawn Perils of Yoth.
Revelation – You must either (choose one):
● Set Perils of Yoth aside, out of play. (This exploration fails.)
● Set Perils of Yoth aside, out of play; take horror or damage equal to the current depth level; and continue exploring as if you had not drawn Perils of Yoth.
Quantity: 1
Number: 60
Illustrator: Joshua Cairós

0 Comments
Resentful Wilds
Type: Treachery
Encounter Set: Doomed Expedition
Hazard.
Revelation – Take 1 horror and attach Resentful Wilds to the nearest location without a copy of Resentful Wilds attached.
Forced – After you successfully explore at attached location: Add Resentful Wilds to the victory display.
Vengeance 1.
Forced – After you successfully explore at attached location: Add Resentful Wilds to the victory display.
Vengeance 1.
Quantity: 2
Number: 74
Illustrator: Michał Miłkowski


0 Comments
Return to Heart of the Elders, Part 1
Type: Scenario
Perform the setup as indicated in The Forgotten Age Campaign Guide, with the following exceptions:
● When gathering encounter sets, also gather the new encounter set for Return to Heart of the Elders shown here.
● Remove Act 1a—“Search for the Pattern” from the game and replace it with the new Act 1a—“A Familiar Pattern.”
● When gathering encounter sets, also gather the new encounter set for Return to Heart of the Elders shown here.
● Remove Act 1a—“Search for the Pattern” from the game and replace it with the new Act 1a—“A Familiar Pattern.”
● When building the exploration deck, only use one of the two locations with each of the following four connection symbols, chosen at random:
Remove the other four Jungle locations from the game without looking at them. Do not include any of the other encounter cards listed in the original setup instructions. (There should be a total of 6 cards.)
—————
For the duration of this scenario, use the following alternative exploration rules:
“The ‘check your supplies’ ability on the Mouth of K’n-yan can be used from any location.
Forced – After a successful exploration ends: Shuffle the top card of the encounter deck into the exploration deck.”
Attach this card to the scenario reference card as a reminder.
Quantity: 1
Number: 45a
Illustrator: —————

0 Comments
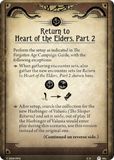
Return to Heart of the Elders, Part 2
Type: Scenario
Perform the setup as indicated in The Forgotten Age Campaign Guide, with the following exceptions:
● When gathering encounter sets, also gather the new encounter set for Return to Heart of the Elders shown here.
● After setup, search the collection for the new Harbinger of Valusia (The Sleeper Returns) and set it aside, out of play. If the Harbinger of Valusia would enter play during this scenario, use this version instead of the original one.
● When building the exploration deck, only use one of the two locations with each of the following four connection symbols, chosen at random:
Remove the other four Ancient locations from the game without looking at them. Do not include any of the other encounter cards listed in the original setup instructions. (There should be a total of 5 cards, not counting the set-aside Descent to Yoth.)
—————
For the duration of this scenario, the following additional rules apply:
“The ‘check your supplies’ ability on the Mouth of K’n-yan can be used from any location, and it discards enemies as well as treacheries.
Forced – After a successful exploration ends: Shuffle the top card of the encounter deck into the exploration deck.”
Attach this card to the scenario reference card as a reminder.
Quantity: 1
Number: 48a
Illustrator: —————


0 Comments
Return to Shattered Aeons
Type: Scenario
Perform the setup as indicated in The Forgotten Age Campaign Guide, with the following exceptions:
● When gathering encounter sets, also gather the new encounter set for Return to Shattered Aeons shown here.
● When building the exploration deck, use only the 4 single-sided Otherworld locations. Do not include any of the other encounter cards listed in the original setup instructions.
● When gathering encounter sets, also gather the new encounter set for Return to Shattered Aeons shown here.
● When building the exploration deck, use only the 4 single-sided Otherworld locations. Do not include any of the other encounter cards listed in the original setup instructions.
● Set the new Shattered locations aside, out of play.
—————
For the duration of this scenario, the following additional rule applies:
“Forced – After a successful exploration ends: Shuffle the top card of the encounter deck into the exploration deck.”
Attach this card to the scenario reference card as a reminder.
—————
For the duration of this scenario, the following additional rule applies:
“Forced – After a successful exploration ends: Shuffle the top card of the encounter deck into the exploration deck.”
Attach this card to the scenario reference card as a reminder.
Quantity: 1
Number: 61a
Illustrator: —————


0 Comments
Return to The Boundary Beyond
Type: Scenario
Perform the setup as indicated in The Forgotten Age Campaign Guide, with the following exceptions:
● When gathering encounter sets, also gather the new encounter set for Return to The Boundary Beyond shown here.
(Continued on reverse side.)
● When gathering encounter sets, also gather the new encounter set for Return to The Boundary Beyond shown here.
(Continued on reverse side.)
● Add the new Present-Day locations to the original locations from The Boundary Beyond encounter set. Remove 1 of the 2 copies of each of these locations from the game at random. Put the remaining locations into play.
● After setup, search the collection for the new Harbinger of Valusia (The Sleeper Returns) and set it aside, out of play. If the Harbinger of Valusia would enter play during this scenario, use this version instead of the original one.
● When building the exploration deck, use only the 12 single-sided Ancient locations. Do not include any of the other encounter cards listed in the original setup instructions.
Quantity: 1
Number: 38
Illustrator: —————


0 Comments
Return to The City of Archives
Type: Scenario
Perform the setup as indicated in The Forgotten Age Campaign Guide, with the following exceptions:
● When gathering encounter sets, also gather the new encounter set for Return to The City of Archives shown here.
● Put Halls of Pnakotus (Southern Corridors) into play.
(Continued on reverse side.)
● When gathering encounter sets, also gather the new encounter set for Return to The City of Archives shown here.
● Put Halls of Pnakotus (Southern Corridors) into play.
(Continued on reverse side.)
● Set Cyclopean Vaults and Alien Conservatory aside, out of play. (These locations should be put into play during act 1b when the remainder of the set-aside locations are put into play.)
● Remove Act 2a—“Restricted Access” from the game and replace it with the new Act 2a—“Unrestricted Access.”
● Remove Act 2a—“Restricted Access” from the game and replace it with the new Act 2a—“Unrestricted Access.”
Quantity: 1
Number: 53a
Illustrator: —————


0 Comments
Return to The Depths of Yoth
Type: Scenario
Perform the setup as indicated in The Forgotten Age Campaign Guide, with the following exceptions:
● When gathering encounter sets, also gather the new encounter set for Return to The Depths of Yoth shown here.
● After setup, search the collection for the new Harbinger of Valusia (The Sleeper Returns) and set it aside, out of play. If the Harbinger of Valusia would enter play during this scenario, use this version instead of the original one.
After building the exploration deck during setup, shuffle the Perils of Yoth treachery into the exploration deck.
—————
For the duration of this scenario, the following additional rule applies:
“Forced – After a new exploration deck is created during act 1b: Search the encounter deck, discard pile, and all out-of-play areas for Perils of Yoth and shuffle it into the exploration deck. Shuffle the encounter deck if it was searched.”
Attach this card to the scenario reference card as a reminder.
Quantity: 1
Number: 59a
Illustrator: —————


0 Comments
Return to The Doom of Eztli
Type: Scenario
Perform the setup as indicated in The Forgotten Age Campaign Guide, with the following exceptions:
● When gathering encounter sets, also gather the new encounter set for Return to The Doom of Eztli shown here.
● Gather the 3 Pit Viper cards from the Serpents encounter set and set them aside, out of play.
● Before setup, remove the original Burial Pit, Underground Ruins, and Secret Passage locations from the game.
(Continued on reverse side.)
● Before setup, replace the original Entryway, Ancient Hall, Grand Chamber, and Chamber of Time locations with the new versions from this encounter set.
● Before setup, replace the original Harbinger of Valusia enemy with the new Harbinger of Valusia (The Sleeper Returns).
● When building the exploration deck, use only Sealed Passage, Mosaic Chamber, Tomb of the Ancients, Throne Room, Snake Pit, Ancient Hall, and Grand Chamber. Do not include any of the other encounter cards listed in the original setup instructions.
—————
For the duration of this scenario, the following additional rule applies:
“Forced – After a successful exploration ends: Shuffle the top card of the encounter deck into the exploration deck.”
Attach this card to the scenario reference card as a reminder.
Quantity: 1
Number: 17a
Illustrator: —————


0 Comments
Return to The Untamed Wilds
Type: Scenario
Perform the setup as indicated in The Forgotten Age Campaign Guide, with the following exceptions:
● When gathering encounter sets, also gather the new encounter set for Return to The Untamed Wilds shown here.
(Continued on reverse side.)
● When gathering encounter sets, also gather the new encounter set for Return to The Untamed Wilds shown here.
(Continued on reverse side.)
When building the exploration deck, only use one of the two locations with each of the following four connection symbols, chosen at random:
Remove the other four Jungle locations from the game without looking at them. Do not include any of the other encounter cards listed in the original setup instructions. (There should be a total of 5 cards.)
—————
For the duration of this scenario, the following additional rules apply:
“The ‘check your supplies’ ability on the Expedition Camp can be used from any location.
Forced – After a successful exploration ends: Shuffle the top card of the encounter deck into the exploration deck.”
Attach this card to the scenario reference card as a reminder.
Quantity: 1
Number: 16a
Illustrator: —————


0 Comments
Return to Threads of Fate
Type: Scenario
Perform the setup as indicated in The Forgotten Age Campaign Guide, with the following exceptions:
● When gathering encounter sets, also gather the new encounter set for Return to Threads of Fate shown here.
● Set the Veda Whitsley story-asset aside, out of play.
(Continued on reverse side.)
● When gathering encounter sets, also gather the new encounter set for Return to Threads of Fate shown here.
● Set the Veda Whitsley story-asset aside, out of play.
(Continued on reverse side.)
● This encounter set contains a fourth “g/h” act deck. Adjust the contents of the “g/h” act deck as follows. The investigators must decide (choose one):
If you wish to find the source named in the Advertiser’s story, remove the following act cards from the “g/h” deck: Search for the Meaning, both copies of The Overgrown Estate, and 1 of the 2 copies of Seeking Trouble, at random.
If you wish to find the root of the problem, remove the following act cards from the “g/h” deck: Search for the Source, both copies of Seeking Trouble, and 1 of the 2 copies of The Overgrown Estate, at random.
Quantity: 1
Number: 28a
Illustrator: —————


0 Comments
Return to Turn Back Time
Type: Scenario
Perform the setup as indicated in The Forgotten Age Campaign Guide, with the following exceptions:
● When gathering encounter sets, also gather the new encounter set for Return to The Doom of Eztli shown here.
● Gather the 3 Pit Viper cards from the Serpents encounter set and set them aside, out of play.
● Before setup, remove the original Burial Pit, Underground Ruins, and Secret Passage locations from the game.
(Continued on reverse side.)
● Before setup, replace the original Entryway, Ancient Hall, Grand Chamber, and Chamber of Time locations with the new versions from this encounter set.
● Before setup, replace the original Harbinger of Valusia enemy with the new Harbinger of Valusia (The Sleeper Returns).
● When building the exploration deck, use only Sealed Passage, Mosaic Chamber, Tomb of the Ancients, Throne Room, Snake Pit, Ancient Hall, and Grand Chamber. Do not include any of the other encounter cards listed in the original setup instructions.
—————
For the duration of this scenario, the following additional rule applies:
“Forced – After a successful exploration ends: Shuffle the top card of the encounter deck into the exploration deck.”
Attach this card to the scenario reference card as a reminder.
● Before setup, replace the original Harbinger of Valusia enemy with the new Harbinger of Valusia (The Sleeper Returns).
● When building the exploration deck, use only Sealed Passage, Mosaic Chamber, Tomb of the Ancients, Throne Room, Snake Pit, Ancient Hall, and Grand Chamber. Do not include any of the other encounter cards listed in the original setup instructions.
—————
For the duration of this scenario, the following additional rule applies:
“Forced – After a successful exploration ends: Shuffle the top card of the encounter deck into the exploration deck.”
Attach this card to the scenario reference card as a reminder.
Quantity: 1
Number: 66a
Illustrator: —————

0 Comments
Riverside Temple
Type: Location
Encounter Set: Return to the Rainforest
Ancient. Jungle.
Forced – After any number of clues are discovered from Riverside Temple: Check your supplies. If no investigator at Riverside Temple has chalk, shuffle an equal number of cards from the top of the encounter deck into the exploration deck.
Quantity: 1
Number: 67
Illustrator: Jason Caffoe

0 Comments
Ruins of K’n-yan
Type: Location
Encounter Set: Return to K’n-yan
Victory: 1
Ancient. Cave. Ruins.
[Action] [Action]: Check your supplies. If you have a compass, discover 2 clues on Ruins of K’n-yan. (Group limit once per game.)
Quantity: 1
Number: 49
Illustrator: Nele Diel

0 Comments
Sealed Passage
Type: Location
Encounter Set: Return to The Doom of Eztli
Ancient. Ruins.
[Action] Check your supplies. If you have the Key of Eztli: Search the exploration deck and all set-aside cards for Chamber of Time and put it into play. If it is act 1a, skip directly to act 2a. For the remainder of this act, Sealed Passage is connected to Chamber of Time and vice versa. (Group limit once per game.)
Quantity: 1
Number: 20
Illustrator: Greg Bobrowski


0 Comments
Search for the Meaning
Type: Act
Encounter Set: Return to Threads of Fate
Clue Threshold: 1
Objective – Only investigators in Rivertown can spend the requisite number of clues, as a group, to advance.
Revelation – Put The Hastings Estate into play.
[Action] Cross medicine off from your supplies: Discover all of the clues on The Hastings Estate.
[Action] Cross medicine off from your supplies: Discover all of the clues on The Hastings Estate.
You decide to head to the estate of Marshall Hastings to learn more about the strange happenings mentioned in the Advertiser’s article. Perhaps this new development can shed light on your other recent troubles.
Quantity: 1
Number: 29a
Illustrator: Joshua Cairós


0 Comments
Search for the Source
Type: Act
Encounter Set: Return to Threads of Fate
Clue Threshold: 1
Objective – Only investigators in Northside can spend the requisite number of clues, as a group, to advance.
Revelation – Put Merle Garvin into play at Miskatonic University.
[Action]: Parley. Mr. Garvin tries to give you the slip. Test [Agility] (2). If you succeed, place 1 clue on Merle Garvin (from the token pool) and move him 1 location away from you. If you fail, move him 2 locations away from you.
[Action]: Parley. Mr. Garvin tries to give you the slip. Test [Agility] (2). If you succeed, place 1 clue on Merle Garvin (from the token pool) and move him 1 location away from you. If you fail, move him 2 locations away from you.
In order to get to the bottom of this new development, you decide to search for the anonymous source of the Advertiser’s article. Perhaps if you head to its offices in Northside, you can inquire further—although you may have to grease a few palms to get the information you need.
Quantity: 1
Number: 30a
Illustrator: Joshua Cairós


0 Comments
Seeking Trouble
Type: Act
Encounter Set: Return to Threads of Fate
Clue Threshold: –
Objective – If there are 1[per investigator] clues on Merle Garvin: You must remove them and immediately advance.
Revelation – Put Loading Docks into play with 4 resources on it. Advance to Act 3g—“Discover the Truth.”
While there are no resources on Loading Docks, clues on it cannot be discovered by any means.
Forced – At the end of the round: Remove 1 resource from Loading Docks.
While there are no resources on Loading Docks, clues on it cannot be discovered by any means.
Forced – At the end of the round: Remove 1 resource from Loading Docks.
You’ve learned the identity of the Advertiser’s source: a man named Merle Garvin, who recently returned from an expedition funded by none other than Marshall Hastings. He was last seen anxiously rummaging through the library at the university, though nobody is quite sure why.
Quantity: 1
Number: 34
Illustrator: Joshua Cairós


0 Comments
Seeking Trouble
Type: Act
Encounter Set: Return to Threads of Fate
Clue Threshold: –
Objective – If there are 1[per investigator] clues on Merle Garvin: You must remove them and immediately advance.
When you finally track Mr. Garvin down and corner him, he is absolutely terrified—not of you, but of something else entirely. “It’s coming,” he warns, “it won’t ever stop until all of us are dead. Please, you have to help me! You have to hide me!” Before you can ask what it is that frightens him so, your unspoken question is answered by a familiar rattling. The dreadful sound makes your skin crawl. How could it be here in Arkham?
Search the collection for the Harbinger of Valusia (The Sleeper Returns) and spawn it at Merle Garvin’s location. It enters play with damage on it equal to the amount of damage recorded in parentheses in your Campaign Log. If there are 5 or fewer tally marks under "Yig's Fury" in your Campaign Log, it enters play exhausted.
Advance to Act 3g—“Impossible Pursuit.”
You’ve learned the identity of the Advertiser’s source: a man named Merle Garvin, who recently returned from an expedition funded by none other than Marshall Hastings. He was last seen anxiously rummaging through the library at the university, though nobody is quite sure why.
Quantity: 1
Number: 33
Illustrator: Joshua Cairós

0 Comments
Sell Your Soul
Type: Treachery
Encounter Set: Weakness
Pact.
Revelation – Lose 10 resources. If you cannot, your dark patron tears your consciousness from your body. You are driven insane.
One way or another, the debt shall be repaid.
Quantity: 1
Number: 15
Illustrator: Andreas Zafiratos
0 Comments
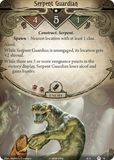
Serpent Guardian
Type: Enemy
Encounter Set: Venomous Hate
Fight: 4
Health: 5
Evade: 1
Damage: 2
Horror:
Construct. Serpent.
Spawn – Nearest location with at least 1 clue.
Aloof.
While Serpent Guardian is unengaged, its location gets +2 shroud.
While there are 3 or more vengeance points in the victory display, Serpent Guardian loses aloof and gains hunter.
Aloof.
While Serpent Guardian is unengaged, its location gets +2 shroud.
While there are 3 or more vengeance points in the victory display, Serpent Guardian loses aloof and gains hunter.
Quantity: 1
Number: 79
Illustrator: Matthew Cowdery

0 Comments
Snake Pit
Type: Location
Encounter Set: Return to The Doom of Eztli
Ancient. Ruins.
Forced – After you put Snake Pit into play by exploring successfully, but before moving to it: Spawn 1[per investigator] set-aside Pit Viper enemies in Snake Pit (to a maximum of 3). Check your supplies. If an investigator at your location has binoculars, you may choose not to move to Snake Pit. Otherwise, you must move to it.
Quantity: 1
Number: 24
Illustrator: Ethan Patrick Harris

