
 Sign In
 Create Account
Welcome to Card Game DB
Register now to gain access to all of our features. Once registered and logged in, you will be able to create topics, post replies to existing threads, give reputation to your fellow members, get your own private messenger, post status updates, manage your profile and so much more. If you already have an account, login here - otherwise create an account for free today!
Register now to gain access to all of our features. Once registered and logged in, you will be able to create topics, post replies to existing threads, give reputation to your fellow members, get your own private messenger, post status updates, manage your profile and so much more. If you already have an account, login here - otherwise create an account for free today!
The Labyrinths of Lunacy
Spoiler Protection:
?


0 Comments
In the Labyrinths of Lunacy
Type: Scenario
Encounter Set: In the Labyrinths of Lunacy
[Skull]: –1. Reveal another token.
[Cultist]: –3. If you fail, place 1 of your clues on your location.
[Tablet]: –4. If you fail, lose 2 resources.
[Elder Thing]: –4. If you fail, discard a random card from your hand.
[Cultist]: –3. If you fail, place 1 of your clues on your location.
[Tablet]: –4. If you fail, lose 2 resources.
[Elder Thing]: –4. If you fail, discard a random card from your hand.
[Skull]: –1. Reveal another token. If you fail, you must either take 1 damage or 1 horror.
[Cultist]: –3. Place 1 of your clues on your location.
[Tablet]: –4. Lose 2 resources.
[Elder Thing]: –4. Discard a random card from your hand.
[Cultist]: –3. Place 1 of your clues on your location.
[Tablet]: –4. Lose 2 resources.
[Elder Thing]: –4. Discard a random card from your hand.
Quantity: 1
Number: 1a
Illustrator: ———

0 Comments
Eixodolon
Type: Enemy
Encounter Set: In the Labyrinths of Lunacy
Fight: 2
Health: 6
Evade: 3
Damage: 2
Horror: 2
Victory: 3
Humanoid. Servitor. Elite.
Hunter. Retaliate.
Eixodolon gets +6[per investigator] health and cannot be defeated by damage.
Forced – When the enemy phase begins, if there is a copy of Harvested Pain in the victory display: Ready Eixodolon.
Eixodolon gets +6[per investigator] health and cannot be defeated by damage.
Forced – When the enemy phase begins, if there is a copy of Harvested Pain in the victory display: Ready Eixodolon.
Quantity: 1
Number: 48
Illustrator: Ilich Henriquez

0 Comments
Eixodolon’s Pet
Type: Enemy
Encounter Set: Epic Multiplayer
Fight: 4
Health: 4󲆃
Evade: 4
Damage: 2
Horror: 1
Victory: 2
Monster. Elite.
Hunter. Retaliate.
While Eixodolon’s Pet is “locked away,” it is immune to player card effects and Chamber of Hunger gains: “[Action] Investigators at Chamber of Hunger spend 1[per investigator] clues, as a group: Set Eixodolon’s Pet aside, out of play. Remember that you “sent Eixodolon’s Pet to another group.”
While Eixodolon’s Pet is “locked away,” it is immune to player card effects and Chamber of Hunger gains: “[Action] Investigators at Chamber of Hunger spend 1[per investigator] clues, as a group: Set Eixodolon’s Pet aside, out of play. Remember that you “sent Eixodolon’s Pet to another group.”
Quantity: 1
Number: 49
Illustrator: Helge C. Balzer

0 Comments
Eixodolon’s Pet
Type: Enemy
Encounter Set: Single Group
Fight: 4
Health: 4󲆃
Evade: 4
Damage: 2
Horror: 1
Victory: 2
Monster. Elite.
Hunter. Retaliate.
While Eixodolon’s Pet is “locked away,” it is immune to player card effects.
While Eixodolon’s Pet is “locked away,” it is immune to player card effects.
Quantity: 1
Number: 50
Illustrator: Helge C. Balzer

0 Comments
The Jailor
Type: Enemy
Encounter Set: Epic Multiplayer
Fight: 3
Health: 12
Evade: 3
Damage: 2
Horror:
Victory: 5
Monster. Elite.
Spawn – Nearest Labyrinthine Halls.
Hunter.
Eixodolon’s Note gains: “[Action] Fight. Use only on The Jailor. Use either [Willpower] or [Combat] for this attack. If you succeed, set The Jailor aside, out of play. At the end of the round, move The Jailor to another group’s Labyrinthine Halls (it keeps all tokens and attachments).”
Hunter.
Eixodolon’s Note gains: “[Action] Fight. Use only on The Jailor. Use either [Willpower] or [Combat] for this attack. If you succeed, set The Jailor aside, out of play. At the end of the round, move The Jailor to another group’s Labyrinthine Halls (it keeps all tokens and attachments).”
Quantity: 1
Number: 51
Illustrator: Nicholas Gregory

0 Comments
Key of Mysteries
Type: Asset
Class:
Cost: –
Level: 0
Willpower: 0
Intellect: 0
Combat: 0
Agility: 0
Wild: 0
Item. Key.
Forced – When you are defeated: Place Key of Mysteries at your location.
While the Key of Mysteries is uncontrolled, it gains: “[Action]: Investigate. If you succeed, instead of discovering clues, take control of the Key of Mysteries.”
While the Key of Mysteries is uncontrolled, it gains: “[Action]: Investigate. If you succeed, instead of discovering clues, take control of the Key of Mysteries.”
Emblazoned across the handle is the letter A.
Quantity: 1
Number: 40
Illustrator: Igor Burlakov


0 Comments
Labyrinthine Halls
Type: Location
Encounter Set: In the Labyrinths of Lunacy
[Action] [Action]: You peer through an overgrown mirror and see an unfamiliar reflection. At the end of the round, choose another investigator in any group. That investigator may take 2 additional actions during his or her next turn. (Group limit once per game.)
Halls of corrugated steel and concrete fill this strange industrial complex. The numerous locked doors and dead ends fill you with a sense that you will never escape.
Quantity: 1
Number: 27
Illustrator: Lloyd Allan


0 Comments
Labyrinthine Halls
Type: Location
Encounter Set: In the Labyrinths of Lunacy
[Free] Spend 4 resources: You find the corpse of someone you think you once knew, and wish you could have saved them. At the end of the round, choose another investigator in any group. That investigator gains 4 resources. (Group limit once per game.)
Halls of corrugated steel and concrete fill this strange industrial complex. The numerous locked doors and dead ends fill you with a sense that you will never escape.
Quantity: 1
Number: 26
Illustrator: Lloyd Allan


0 Comments
Labyrinthine Halls
Type: Location
Encounter Set: In the Labyrinths of Lunacy
[Free] Choose and discard 2 cards from your hand: You find an old lockbox in a pile of refuse, and decide to leave something behind. At the end of the round, choose another investigator in any group. That investigator draws 2 cards. (Group limit once per game.)
Halls of corrugated steel and concrete fill this strange industrial complex. The numerous locked doors and dead ends fill you with a sense that you will never escape.
Quantity: 1
Number: 25
Illustrator: Lloyd Allan

0 Comments
Mi-Go Guard
Type: Enemy
Encounter Set: In the Labyrinths of Lunacy
Fight: 3
Health: 3
Evade: 1
Damage: 1
Horror: 1
Monster. Mi-Go.
Prey – Most remaining health.
For each [Skull], [Cultist], [Tablet], or [Elder Thing] token revealed during an attack against Mi-Go Guard, that attack deals 1 fewer damage.
For each [Skull], [Cultist], [Tablet], or [Elder Thing] token revealed during an attack against Mi-Go Guard, that attack deals 1 fewer damage.
Quantity: 3
Number: 54
Illustrator: Marco Caradonna

0 Comments
Mysterious Syringe
Type: Asset
Class:
Cost: –
Level: 0
Willpower: 0
Intellect: 0
Combat: 0
Agility: 0
Wild: 0
Item.
Forced – When you are defeated: Give control of Mysterious Syringe to another investigator.
[Action]: Choose an investigator at your location and remove Mysterious Syringe from the game. Remember that the chosen investigator has “been injected.”
[Action]: Choose an investigator at your location and remove Mysterious Syringe from the game. Remember that the chosen investigator has “been injected.”
Emblazoned across the handle is the letter B.
Quantity: 1
Number: 41
Illustrator: Igor Burlakov
0 Comments
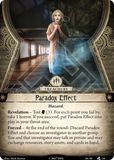
Paradox Effect
Type: Treachery
Encounter Set: Epic Multiplayer
Hazard.
Revelation – Test [Willpower] (3). For each point you fail by, take 1 horror. If you succeed, put Paradox Effect into play in your threat area.
Forced – At the end of the round: Discard Paradox Effect and choose an investigator in another group. You and that investigator may talk in private and may exchange resources, story assets, and cards in hand.
Forced – At the end of the round: Discard Paradox Effect and choose an investigator in another group. You and that investigator may talk in private and may exchange resources, story assets, and cards in hand.
Quantity: 3
Number: 59
Illustrator: Mark Molnar

0 Comments
Paradox Effect
Type: Treachery
Encounter Set: Single Group
Hazard.
Revelation – Test [Willpower] (3). For each point you fail by, take 1 horror.
Reality wavers.
Reality splits.
Reality reforms, and the paradox collapses.
Quantity: 3
Number: 60
Illustrator: Mark Molnar
0 Comments
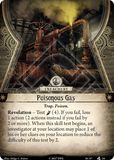
Poisonous Gas
Type: Treachery
Encounter Set: In the Labyrinths of Lunacy
Trap. Poison.
Revelation – Test [Agility] (4). If you fail, lose 1 action (2 actions instead if you fail by 2 or more). When this skill test begins, an investigator at your location may place 1 of his or her clues on your location to reduce the difficulty of this test by 2.
Quantity: 3
Number: 56
Illustrator: Helge C. Balzer

0 Comments
Rot Diagram
Type: Asset
Class:
Cost: –
Level: 0
Willpower: 0
Intellect: 0
Combat: 0
Agility: 0
Wild: 0
Item. Script.
Forced – When you are defeated: Give control of Rot Diagram to another investigator.
While you are in the Chamber of Decay, it gains: “[Action]: Place 1 doom here. Flip any number of your clues to their doom side and place them here.”
While you are in the Chamber of Decay, it gains: “[Action]: Place 1 doom here. Flip any number of your clues to their doom side and place them here.”
Perhaps one of the groups can make sense of this?
Quantity: 1
Number: 42
Illustrator: Christopher Hosch

0 Comments
Rot Diagram
Type: Asset
Class:
Cost: –
Level: 0
Willpower: 0
Intellect: 0
Combat: 0
Agility: 0
Wild: 0
Item. Script.
Forced – When you are defeated: Give control of Rot Diagram to another investigator.
While you are in the Chamber of Rot, it gains: “[Action]: Investigate. If you succeed, instead of discovering clues, take control of the set-aside Mysterious Syringe.”
While you are in the Chamber of Rot, it gains: “[Action]: Investigate. If you succeed, instead of discovering clues, take control of the set-aside Mysterious Syringe.”
Quantity: 1
Number: 43
Illustrator: Christopher Hosch


0 Comments
Sealed In (Group A)
Type: Act
Encounter Set: In the Labyrinths of Lunacy
Clue Threshold: 2󲆃
Timed – Do not advance this act until you are instructed. By the time the agenda advances, investigators must possess the Key of Mysteries and the requisite number of clues. (Beware—If the agenda advances and you do not meet this condition, each investigator in this group will be killed.)
If the investigators possess the Key of Mysteries and 2[per investigator] clues:
You push the key into the lock, and the wall of the chamber opens up, leading into a dark, narrow corridor of corrugated metal and concrete. The whistling of the pipes all around you dampens to a faint whimper.
The investigators spend 2[per investigator] clues, as a group. Remove the Key of Mysteries from the game. Resolve Act 2 Setup.
—————————————————————————
If the investigators do not possess the Key of Mysteries and/or 2[per investigator] clues:
A powerful, noxious gas spews forth from the vents and fills the room. Your vision grow hazy and you collapse to the ground. “The fait that inevitably awaits us all,” a sinister voice explains. Everything goes dark.
Each investigator in this group is killed. (->R1)
“You have one hour to discover the way out,†your note reads, “or you will breathe in death.â€
Quantity: 1
Number: 7
Illustrator: Anthony Devine


0 Comments
Seeping Death (Group B)
Type: Act
Encounter Set: In the Labyrinths of Lunacy
Clue Threshold: –
Timed – Do not advance this act until you are instructed. Before the agenda advances, one investigator must activate the [Action] ability on the Chamber of Poison.
If an investigator activated the [Action] ability on the Chamber of Poison, that investigator reads the following:
—If you have “been injected,” the sludge is disgusting but harmless. Resolve Act 3 Setup.
—If you have not “been injected,” its poison seeps through your skin, devouring your organs from inside. You are killed. Resolve Act 3 Setup.
—————————————————————————
If no investigator activated the [Action] ability on the Chamber of Poison:
The floors and walls of the entire labyrinth shift and turn, and you lose your balance. Sliding along the floor as gravity twists, you are knocked into the poisonous pit.
Move each investigator to the Chamber of Poison. Each investigator in this group who has not “been injected” is killed. Resolve Act 3 Setup.
Glowing words continue to appear on your note. “The Chamber of Poison awaits,†it reads. “One of you must open the way,†your note reads. “A sacrifice, for the greater good.â€
Quantity: 1
Number: 12
Illustrator: Anthony Devine


0 Comments
The Dilemma
Type: Story
Encounter Set: Epic Multiplayer
Act 2.
Revelation – Put The Dilemma into play, next to the act deck.
The current act gains: “[Reaction] At the end of the round: Desperate, you are willing to sacrifice yourself for the benefit of the other groups. Flip The Dilemma over and follow the instructions on the other side.”
The current act gains: “[Reaction] At the end of the round: Desperate, you are willing to sacrifice yourself for the benefit of the other groups. Flip The Dilemma over and follow the instructions on the other side.”
You write “I choose death” on the note. Words appear just below yours, spelling out a sentence in reply. “Did you really think I would let you die that easily?”
You must choose and discard all but X cards from your hand, and remove all but X resources from your resource pool. X is the amount of doom on the current agenda.
Read the following to each group aloud:
The words and letters on the note shift and change to form a strange diagram.
The lead investigator of Group A takes control of the set-aside Rot Diagram.
The lead investigator of Group B takes control of the set-aside Hunger Diagram.
The lead investigator of Group C takes control of the set-aside Decay Diagram.
Remove each group’s copy of The Dilemma from the game.
Glowing words appear on your group’s note as though written by an unseen entity. It reads: “Worry not. I shall give your friends a chance to escape. All you have to do is perish at their expense, and they will be given the means to escape. Just write ‘I choose death’ on this note here, and the deed will be done.â€
Quantity: 1
Number: 36
Illustrator: ———


0 Comments
The Escape
Type: Act
Encounter Set: Epic Multiplayer
Clue Threshold: –
Objective – At the end of the round, if Eixodolon has no remaining health, you may move any damage on him in excess of his health to another group’s copy of Eixodolon. Then, advance.
If any copy of Eixodolon in any surviving group’s play area has health remaining:
The figure distorts and shimmers through space-time.
Flip this act back over.
—————————————————————————
If each other surviving group’s copy of Eixodolon has no health remaining:
– If your group is the only surviving group, proceed to (->R2).
– If only two groups survived, those groups proceed to (->R3).
– If all three groups survived, all three groups proceed to (->R4).
“You are close to freedom,†the figure’s distorted voice crackles. “Do you still have hope in your voice? Do you still have light in your eyes?â€
Quantity: 1
Number: 14
Illustrator: Anthony Devine


0 Comments
The Escape
Type: Act
Encounter Set: Single Group
Clue Threshold: –
Objective – If Eixodolon has no remaining health, advance.
If you are playing in standalone mode:
Proceed to (->R2).
If you are playing as a mini-campaign and this is the first or second group played:
Begin as a new group to discover which resolution is reached.
If you are playing as a mini-campaign, and this is the third group played:
– If only one group survived, proceed to (->R2).
– If two groups survived, proceed to (->R3).
– If all three groups survived, proceed to (->R4).
“You are close to freedom,†the figure’s distorted voice crackles. “Do you still have hope in your voice? Do you still have light in your eyes?â€
Quantity: 1
Number: 15
Illustrator: Anthony Devine


0 Comments
The Gate
Type: Story
Encounter Set: Epic Multiplayer
Act 2.
Revelation – Attach The Gate to a Distortion location.
[Action] Spend 1 clue: You enter the doorway. Flip this story card over and follow the instructions on its other side.
[Action] Spend 1 clue: You enter the doorway. Flip this story card over and follow the instructions on its other side.
Depending on which group you are in, put a different location into play, as follows:
– If you are in Group A, put the Chamber of Rot into play.
– If you are in Group B, put the Chamber of Hunger into play.
– If you are in Group C, put the Chamber of Decay into play.
Disengage from each enemy and move to the location just put into play.
Until there is at least 5 doom on the current agenda, that location is not considered to be connected to any other location.
Remove this card from the game.
You notice a doorway in your chamber that wasn’t there before. On the other side, the hall is pitch black. Where does it lead?
Quantity: 1
Number: 37
Illustrator: ———

0 Comments
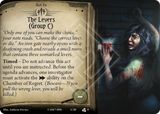
The Levers (Group C)
Type: Act
Encounter Set: Epic Multiplayer
Clue Threshold: –
Timed – Do not advance this act until you are instructed. Before the agenda advances, one investigator must activate the [Action] ability on the Chamber of Regret. (Beware—If you pull the wrong lever, you will be killed.)
If an investigator activated the [Action] ability on the Chamber of Regret, that investigator examines the Chamber of Secrets in Group A’s play area to see if its flavor text matches the lever that was pulled.
—If it does not match, rows of razor-sharp blades emerge from the walls of the chamber, dissecting you with horrifying precision. You are killed. Resolve Act 2 Setup.
—If it matches, the gate ascends, and the door in the Chamber of Night opens. Resolve Act 2 Setup.
————————————————————————————
If no investigator activated the [Action] ability on the Chamber of Regret:
Time is up. You rush to the levers, but you are too late. Rows of razor-sharp blades emerge from the walls of the chamber, dissecting you with horrifying precision.
The investigator nearest to the Chamber of Regret is killed. (In the event of a tie, the investigators decide). Resolve Act 2 Setup.
“Only one of you can make the choice,†your note reads. “Choose the correct lever, or die.†An iron gate nearby opens with a deafening crash and reveals a small room that contains three unmarked levers.
Quantity: 1
Number: 9
Illustrator: Anthony Devine


0 Comments
The Levers (Group C)
Type: Act
Encounter Set: Single Group
Clue Threshold:
Timed – Do not advance this act until you are instructed. Before the agenda advances, one investigator must activate the [Action] ability on the Chamber of Regret. (Beware—If you pull the wrong lever, you will be killed.)
If an investigator activated the [Action] ability on the Chamber of Regret, that investigator examines the Chamber of Secrets location underneath the scenario reference card to see if its flavor text matches the lever that was pulled.
—If it does not match, rows of razor-sharp blades emerge from the walls of the chamber, dissecting you with horrifying precision. You are killed. Resolve Act 2 Setup.
—If it matches, the gate ascends, and the door in the Chamber of Night opens. Resolve Act 2 Setup.
————————————————————————————
If no investigator activated the [Action] ability on the Chamber of Regret:
Time is up. You rush to the levers, but you are too late. Rows of razor-sharp blades emerge from the walls of the chamber, dissecting you with horrifying precision.
The investigator nearest to the Chamber of Regret is killed. (In the event of a tie, the investigators decide). Resolve Act 2 Setup.
“Only one of you can make the choice,†your note reads. “Choose the correct lever, or die.†An iron gate nearby opens with a deafening crash and reveals a small room that contains three unmarked levers.
Quantity: 1
Number: 10
Illustrator: Anthony Devine

0 Comments
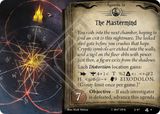
The Mastermind
Type: Agenda
Encounter Set: In the Labyrinths of Lunacy
Doom Threshold: 7
Each Distortion location gains:
“[Action] [Survivor]4+1< T %2[Cultist]+: <+@2 H <@6@~+ [Willpower]9 EIXODOLON. (Group limit once per game.)”
Objective – If each investigator is defeated, advance this agenda.
“[Action] [Survivor]4+1< T %2[Cultist]+: <+@2 H <@6@~+ [Willpower]9 EIXODOLON. (Group limit once per game.)”
Objective – If each investigator is defeated, advance this agenda.
In this timeline, the ritual is complete.
If you are playing in Epic Multiplayer Mode, move all damage from Eixodolon to another group’s copy of Eixodolon.
Each investigator in this group is killed. (->R1)
If you are playing in Epic Multiplayer Mode, move all damage from Eixodolon to another group’s copy of Eixodolon.
Each investigator in this group is killed. (->R1)
You rush into the next chamber, hoping to find an exit to this nightmare. The locked steel gate before you crushes that hope. Cryptic symbols are etched into the walls, and a sigil on the floor ebbs with power. Just then, a figure exits from the shadows.
Quantity: 1
Number: 6
Illustrator: Mark Molnar


0 Comments
The Pet (Group C)
Type: Act
Encounter Set: In the Labyrinths of Lunacy
Clue Threshold: –
Timed – Do not advance this act until you are instructed. Find a way to deal with Eixodolon’s Pet before the agenda advances. (Beware—If the creature is still “locked away” when the agenda advances, it will break free.)
If you “sent Eixodolon’s Pet to another group”:
Choose another group, at random. At the end of the current round, that group spawns their set-aside copy of Eixodolon’s Pet in one of their Labyrinthine Halls. Resolve Act 3 Setup.
—————————————————————————
If Eixodolon’s Pet is in the victory display:
You breathe a sigh of relief as the creature crumples lifelessly to the ground.
Resolve Act 3 Setup.
—————————————————————————
If neither of the above are true:
The creature smashes through the glass of its terrarium and lashes out hungrily at anyone nearby.
Move Eixodolon’s Pet to Chamber of Hunger. It attacks each investigator in the Chamber of Hunger, in player order. Resolve Act 3 Setup.
Glowing words continue to appear on your note. “In the chamber ahead lives my precious pet,†it reads. “He is very hungry. Perhaps you should open his gate and allow him to feed.â€
Quantity: 1
Number: 13
Illustrator: Anthony Devine


0 Comments
The Rift
Type: Story
Encounter Set: Epic Multiplayer
Act 1. Act 2.
Revelation – Attach The Rift to the current act. If it is act 1, Groups B and C put the set-aside Key of Mysteries into play at a Distortion location.
Forced – At the end of the round, if there is at least 3 doom on each group’s agenda: The rift opens wide enough for an investigator to step through. Choose an investigator at any location to enter the rift. Then, that investigator flips this card over and follows the instructions on its other side.
Forced – At the end of the round, if there is at least 3 doom on each group’s agenda: The rift opens wide enough for an investigator to step through. Choose an investigator at any location to enter the rift. Then, that investigator flips this card over and follows the instructions on its other side.
Each investigator that entered the rift takes this story card and meets in private, away from each group. Investigators within the rift can speak freely, and may exchange any number of clues, resources, cards in hand, or story assets controlled. Once the investigators are satisfied, each investigator returns to his or her original group. Flip this card back over.
With a sudden flash of light, a rift begins to open in the wall nearby, energy slowly coalescing into the shape of a portal. It is too small to enter now, but soon it will be large enough for a person to step through...
Quantity: 1
Number: 34
Illustrator: ———


0 Comments
The Vent
Type: Story
Encounter Set: Epic Multiplayer
Act 1. Act 2.
Revelation – Place The Vent in a Distortion location. If it is act 1, Groups B and C put the set-aside Key of Mysteries into play at that location.
[Free]: Place any number of your resource tokens or clues on this card, and/or place any number of Item assets you control underneath this card. You may also place a written note underneath this card.
[Action]: Take control of any number of tokens, cards, or notes on/underneath this card.
[Reaction] At the end of the round: You send all of the tokens and cards gathered here through the ventilation shaft. Flip this card over and follow the instructions on the other side.
Take the cards, tokens, and notes on or underneath this card and place them on or underneath another group’s copy of The Vent.
Flip this card back over.
Flip this card back over.
You find a ventilation shaft through which you can fit one or more important items.
Quantity: 1
Number: 35
Illustrator: ———

0 Comments
Tortured Victim
Type: Enemy
Encounter Set: In the Labyrinths of Lunacy
Fight: 2
Health: 2
Evade: 2
Damage: 1
Horror: 1
Humanoid. Extradimensional.
Revelation – You must either discard a random card from your hand, or Tortured Victim makes an immediate attack against you.
Quantity: 3
Number: 53
Illustrator: Marius Bota
0 Comments
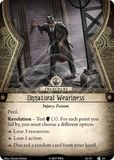
Unnatural Weariness
Type: Treachery
Encounter Set: In the Labyrinths of Lunacy
Injury. Poison.
Peril.
Revelation – Test [Willpower] (3). For each point you fail by, you must choose a different option:
–Lose 3 resources.
–Lose 1 action.
–Discard a random card from your hand.
Revelation – Test [Willpower] (3). For each point you fail by, you must choose a different option:
–Lose 3 resources.
–Lose 1 action.
–Discard a random card from your hand.
Quantity: 3
Number: 55
Illustrator: Dimitri Bielak

