
 Sign In
 Create Account
Welcome to Card Game DB
Register now to gain access to all of our features. Once registered and logged in, you will be able to create topics, post replies to existing threads, give reputation to your fellow members, get your own private messenger, post status updates, manage your profile and so much more. If you already have an account, login here - otherwise create an account for free today!
Register now to gain access to all of our features. Once registered and logged in, you will be able to create topics, post replies to existing threads, give reputation to your fellow members, get your own private messenger, post status updates, manage your profile and so much more. If you already have an account, login here - otherwise create an account for free today!

The Things I Do For Win: Pulling the Trigger on the Mulli-Gun
Jun 01 2012 05:00 AM |
clu
in Game of Thrones
Small Council The Things I Do For Win clu Getting a good start to a game can put you a long ways towards pulling down a W. Usually that means playing many cards during the flop. The more cards placed this way, the more cards you draw to get back up to seven, giving you more options during turn one. Ultimately, the more play options a deck has the more control you have over the game.
Think of it as a funnel. The beginning of the game is the wide opening indicating many options. As the end game nears, the losing player has less choice on how many cards they can play to win or even not lose the game. Playing Harrenhal early is much more useful than spending three gold late on something that isn't a dude that can defend or win challenges when the game is on the line. It makes the most sense to have a base as wide as you can to make more choices than your opponent. This doesn't mean you will win the game, but it should give you more options to avoid losing.
Character Gold Curve
If you missed the dissection of Brett Zeiler’s deck article, I will repost here about the importance of the bell curve. To review, the gold curve lessons follow the advice below:
Take every character and divide them into piles of how much they cost to play situated from zero to x, left to right. A new row is created at every gold value. A shadow card's value is the s cost plus two. For example: Meera’s value in the gold curve is three. 1s + 2 = 3. The resulting lay out should resemble a bell shape. Using ballpark numbers a typical deck runs two cost 0 characters, six cost 1, eight cost 2, ten cost 3, and six cost 4+ for a grand total of 32 characters.
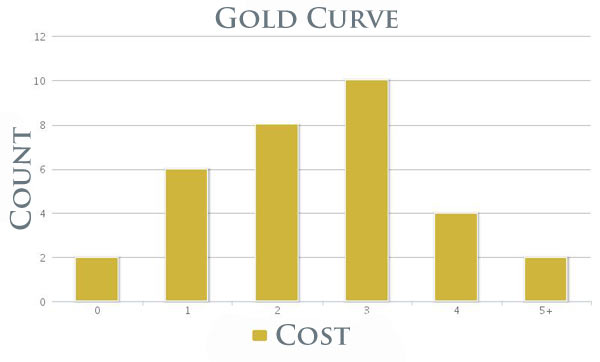
The reason the three gold slot is so heavily weighted is that’s where most of the sweet spot characters live. Strength three can win most challenges by tying on the attack, plus most of them have the key abilities that you are relying on to win. Personally, I don’t like playing more than four characters at the 4 and 5+ slot.
Lower character cost numbers pull the average of the gold curve closer to zero rather then five which is the top of his curve. Cheap characters mean better setups. Better setups mean drawing more cards to refill your hand which equals more options.
More options doesn’t automatically relate to winning the game if the cards you’re drawing into don’t do anything. For an example: drawing three out of four cards for a combo means you have three dead cards in your hand if that’s all they do. The goal of the redraw is reloading your mitt with bigger characters and action cards for the most part.
Keeping Resources vs Characters in a non-combo deck
Resource locations are a boon and bane. Getting them early powers your deck, but getting them late chokes your draw. Getting resources during the Setup phase is awesome. I’m beginning to think it might be the only thing.
Most balanced decks have at least nine card slots out their 60 dedicated to locations/resources. If you can face two or three onto the table during setup, then you have more options during turn one and avoid drawing them when all you need is cardboard with legs. It is assumed that you have put good cards into your deck. If you find yourself having the same options during turn one after dropping some resources than you need to recheck your deck’s gold curve.
Characters that double as resources are incredibly valuable. House Lannister has a strangle hold on some the most efficient walking treasuries out there.
Event and Attachments
Events and attachments work the opposite way from resources. Early these cards tend to slow down your board development when all you want is dudes and resources. Not many of these cards can be faced during Setup. During Setup, if your hand is to the brim with events, then send it back. Most events won’t trigger unless you can use a character in conjunction with them- same with attachments.
These cards count as NA on the gold curve. You are stuck with them during the setup. Having nine to a dozen cards that can’t be placed is fine. More than that requires you to ask "What Jaime would do?"
The Apprentice Collar is a fascinating card. It can be dropped for zero and allows you to dig deeper into your deck. It provides strength pump and protection from certain burn cards, which seems pretty good in a weenie rush deck.
Kill and Card Draw
You can bend the general keep rules if you have two different kinds of cards in your hand. One kill card can nullify an opponent’s setup. Card draw can save a poor flop. I look for resource and draw cards. A combination of these two card types mitigates the character vs location debate. I never want more than three of these opening up. Too much kill is a moot point if I can’t also press my character advantage. Too much card draw leaves me with lots of action later that doesn’t do any good if my opponent has already bagged six power.
Combo Keepers
The staple to a combo deck is a key interaction between several cards.
Meta Setups
The bottom line to always creating favorable setups, is knowing your deck and what is being played against you. A flop of six one strength characters is almost useless against a Targ Burn deck. While a ton of resources gives Burn an opportunity to build their board without disruption. A flop of one four strength character, one location, and location control in hand is far superior. The same six character flop would be great against Stark and Lannister.
When you see the opposing house card you should have a general idea of what is being played against you in tournament settings. Every deck introduces different strategies and you should know what is in your deck to answer the call. Heck, a Red Keep, house chamber, and Westeros Bleeds make me giddy against most matchups.
True Story
During a top eight game I knew that I needed He Calls It Thinking and Southron Mercenaries to counter tons of shadow locations that would eventually hit the table. I mulligan-ed a four character flop because I knew I needed different cards. I pulled into lots of card draw, drew 12 cards over three turns and still whiffed but at least I gave myself a fighting chance.
The Golden Hand Rule
Here are what I consider Setups that I refuse to mulligan out of outside of extreme situations.
Keep
- 4+ characters
- 3 characters, 1 resource
- 2 characters, 2 resources
- 1 character, 3 resources
- 4+ resources
The Knights of the Hollow Hill
Let me start off with saying this agenda is terrible. It is really, really bad. It is also my favorite to play.
Losing during the Setup phase is crippling. What you see is what you get without a chance to pull out of a forced keep. A bad turn one can end your game quickly.
Most decks can out-resource the agenda on a good flop with zero cost reducers. The opponent’s deck then gets to dig deeper for more cards to play against you. Several cards can make the same or more amount of influence available to the Hollow Hill. The initiative is really the only thing that can’t be reproduced easily during Setup. So why play this plague to AGOTers?
It does all three. If you aren’t taking advantage of every resource available with the agenda then don’t play the agenda. This is worth repeating in your head, either stretch those resources to their full extent of leave it the heck alone.
The plus two gold lets you push the gold curve to right with judicious use of reducers. Less card slots are taken up with influence providing locations. Choosing who goes first is a benefit to control decks. When deciding whether to mulligan or not see if you have card draw en mitt. If you do, then keep, if not, then pull the trigger.
- Reager, FioFioFio and sgtpimenta like this


6 Comments
Sorry, this was supposed to be an article suggestion, not a thought experiment.
It mostly hinges on your plot deck and gold curve. Considering that you have no locations in play you will use 2 resources to draw 2 cards. If you are packing 6+ zero cost reducers go ahead. If you are relying on limited gold producers you need to face Samwell. It's all about the totality of the deck.
In a vacuum, I'd recommend playing everything you have every time.
Interesting article idea though!