Welcome to Card Game DB
Register now to gain access to all of our features. Once registered and logged in, you will be able to create topics, post replies to existing threads, give reputation to your fellow members, get your own private messenger, post status updates, manage your profile and so much more. If you already have an account, login here - otherwise create an account for free today!
Register now to gain access to all of our features. Once registered and logged in, you will be able to create topics, post replies to existing threads, give reputation to your fellow members, get your own private messenger, post status updates, manage your profile and so much more. If you already have an account, login here - otherwise create an account for free today!
With Fire and Blood - Resource Management
Nov 07 2012 06:00 PM |
doulos2k
in Game of Thrones
Small Council With Fire and Blood Doulos2k With Fire and Blood - Resource Management
Last time, we introduced the House and talked about some key Core Set cards. If you only have the Core Set and want to know what to buy next or what kinds of decks you can build, we direct you to a couple of other articles here on CardGameDB.com that you should read if you haven't already:
- First Tilt: Expanding House Targaryen
- First Tilt: Deck Archetypes - Targaryen
- Forum Post: Decks built with 2X Cores
Today, we're going to talk a bit about resource management. In this House, we can't even begin that without discussing the House keyword: Ambush. This is one of the most feared keywords in the game because your opponent has to just assume when they see the Targaryen house card, that at some point, you're going to bring a card from hand to defend or attack (or to trigger some other effect). As powerful as Ambush is, it requires you to think about resources much differently than you would if you were playing any other house.
In AGoT, you have two types of resources, Gold and Influence. Ambush requires the use of Influence, but not every character or card has the Ambush keyword, some are still going to require gold to play. This gives us the task of trying to manage two different resource curves during our game. We have to consider this when deckbuilding and we have to think hard about it in-game.
"Play" vs "Put into play"
One thing we have to cover when we talk about using Influence to pay for a card is the difference between what it means to "play" a card or to "put a card into play." This distinction is incredibly important as a Targ player. Some cards require you to "play" a card in order to trigger its ability (like Lady Daenerys's Chambers (Core), a House staple) while others can only be triggered if a card is "put into play" (like Company of the Cat (THoBaW), a newer Ambush Army).
According to the FAQ, "playing" a card always means paying its gold cost (minus any reducers) during the Marshaling phase. The basic rule of thumb is, if you didn't pay gold or use reducers to pay for a card during the Marshaling phase, you didn't "play" the card. If you use Influence (no matter the phase) to put a card into play... you have not "played" the card and vice versa. Using my card examples above, if you use Influence to put a character into play, you cannot use Lady Daenerys' Chambers to recur an attachment from your discard pile. If you pay gold for Company of the Cat, you cannot draw a card.
[NOTE: a question that comes up now and again is the use of Dragon Lore (CbtC) because it allows you to bring a Dragon in for free, like say... Balerion the Black (RotO). Dragon Lore is actually reducing the cost of the character to zero, but you're still "playing" the character. It now simply has a cost of zero.]
Resource Management 101
When you're building your deck, you always have to keep an eye out for your cost curve. In future columns, we'll go over agenda choices and the like, but some of these topics overlap, so I'll be mentioning a few agendas and cards as we go.
Unless you're running Knights of the Hollow Hill (MotM) as your agenda, you need to pay particular attention to your cost curve to try and drop as many cards during setup as possible to gain the maximum advantage of digging through your deck. My rule of thumb is, try to get at least a 3-card flop (meaning at least 3 cards in hand can be placed during the setup phase). This means that before Turn 1, I've seen 10 cards from my deck (1/6th). A great article that covers cost curve in some detail is Clu's "The Things I Do For Win: Pulling the Trigger on the Mulli-gun." If you haven't read that, I'd suggest taking a read before continuing. Go ahead... I'll wait.
What Clu outlines as a basic analysis of cost curve applies to both gold and influence. The issue that you'll run into is... how much of each? Obviously, if you have no Ambush characters in your deck, you're really only managing gold (and you're playing the wrong House... ahem). Taking a page out of Clu's book, I try and perform a two-step analysis for my cost curve. First, if my agenda allows a setup, I do exactly as he recommends and create cost piles. Then, with that in mind, I'll pull out all of my Ambush characters and line those up in their own piles to get an idea of what my Influence needs might be. This gives me an idea of what my overall resource curve will look like. If I actually plan to ambush in a bunch of Dragons... I'm going to need tons of Influence because those beasties cost 4 Influence each.
A solid base formula is the one Twn2dn uses (he mentions it on the FFG forum here a couple of posts down) where he basically has you count up all of your Influence needs and divide by 2 to determine the number of 1-drop Influence locations you should run. When performing the Influence analysis, I also try and pay particular attention to the number spread. Are you running a number of 4-drop cards? You want to ensure you're running enough two-influence locations to help you pay for those without having to kneel four cards. If I'm running an Ambush-heavy deck (or I'm running Dragons), I will almost always go 3X on Kingsroad Fiefdom (QoD) and 1X on Great Pyramid of Meereen (AHM) to try and ensure I have a few sources of high-influence to pay for those expensive characters with just two cards. So, pay attention to your cost spread as well as your overall influence count.
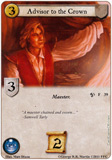
No article about Influence would be complete without mentioning Advisor to the Crown (QoD). If you are running an Ambush-heavy deck, it is worth considering including at least one copy of that card. Why? Because of At the Gates (GotC). If you find that you need the influence Turn 1, having 2 influence dropped into the game for free is always worthy of a look. The initiative isn't great, but you're essentially getting a 6 gold plot with that pick.
Of course - this all got a lot more confusing with the introduction of Dragon Egg (AHM). Planning for that card is difficult because you cannot easily predict when it will be in play nor what you'll have in hand. Any card that doesn't already have Ambush can suddenly gain Ambush... but it might never happen. If you're just starting out, I wouldn't recommend using Dragon Egg until you have a handle on resource management. It can be a great card, but if you count on it, you'll be disappointed.
Other Uses for Influence
I'd be remiss if I didn't mention that there are a number of effects that also require Influence and those effects need to be considered when you're looking at your Influence curve. If you're playing a Mercenary deck and you want to include Recruitment (VD), you have to take a hard look at which Mercenary cards you want to pull from your dead or discard pile and what that influence cost will be.
There are other effects that require Influence. The Hatchlings' Feast (ASitD), a Burn staple, requires three Influence in order to play the event. Horseback Archers (QoD) requires one Influence to put them into play during a challenge. Sorrowful Man (APS) requires two Influence to come out of Shadows to trigger his ability. Those are just a few examples.
All of these things have to be taken into account when you're looking at your deck's overall cost. Targ decks tend to be very location heavy due to the amount of Influence we generally run. I've found that quite often, I'm running about 18-20 locations, 30-33 characters, and then a few attachments or events. Most of my locations are non-limited Influence like 3X Summer Sea (Core), the aforementioned Kingsroad Fiefdom (QoD), and sometimes even Shivering Sea (KotS) (an often overlooked source of cheap Influence). Eastern Fiefdoms (Core) is pretty much an auto-include as well, but it's Limited, so if you're running Temple of the Graces (Core), you might find yourself choked a bit with more than one Limited card in hand on any given turn. I usually try and limit the number of Limited cards to 5 or less.
Conclusions
Balancing your resource curve takes practice and an understanding of how well your draw mechanic is working. Too many resources and you may not draw enough characters. Too few resources and you might be stuck with those characters in hand. Take the time to analyze your deck and determine what it's going to cost you to get those characters from hand and onto the field, then do some test draws to see whether you're getting the resources you need when you need them.
- Archrono, bigfomlof, ringworm and 1 other like this


 Sign In
 Create Account


2 Comments
Except to say that the list wasn't meant to be exhaustive. Still, an important card.