
 Sign In
 Create Account
Welcome to Card Game DB
Register now to gain access to all of our features. Once registered and logged in, you will be able to create topics, post replies to existing threads, give reputation to your fellow members, get your own private messenger, post status updates, manage your profile and so much more. If you already have an account, login here - otherwise create an account for free today!
Register now to gain access to all of our features. Once registered and logged in, you will be able to create topics, post replies to existing threads, give reputation to your fellow members, get your own private messenger, post status updates, manage your profile and so much more. If you already have an account, login here - otherwise create an account for free today!

40k Conquest Fundamentals: The Command Struggle
Nov 21 2015 12:00 AM |
Kingsley
in Warhammer 40k: Conquest
conquest fundamentals economy strategy
Perhaps the most important element of playing a "long game" in Conquest is winning the command struggle. While there is some economy to be found outside of command, the main way most decks will draw cards and gain resources is through the command struggle. This guide explains the basic methods decks can use to do well on the command side of the game.
Step One: Card Selection
Most units that you put in your deck will likely be useful in the command struggle. However, not all such units are created equal. When it comes to the economic side of things, the most efficient units that are widely available are the "one-for-ones" and "two-for-twos" - units that cost one resource and have one command icon or cost two resources and have two command icons.
Here are some good examples of efficient command units:


All factions have access, whether in faction or via allies and neutral units, to at least some of these units, and the humble Void Pirate and Rogue Trader are there to assist besides.
The "one-for-ones" are the most efficient way to take command - the command they take pays for themselves on the turn you play them in the absence of enemy action (or even does better in the case of Pirate or Trader). The "two-for-twos", on the other hand, are the most efficient way to steal command - if your opponent plays a one-for-one, countering with a two-for-two is a great move.
On the other hand, you don't normally want to deploy a two-for-two on its own, since they have poor non-command stats and your opponent can simply avoid opposing them, thus "wasting" their second icon. For this reason, most decks play many one-for-ones but fewer two-for-twos.
If your one-for-one is countered by an enemy two-for-two, what is the best response? The answer is simple - Promotion (or its even better cousin, Recon Drone).
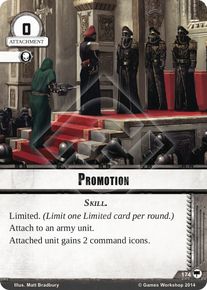

Promotion is perhaps one of the best cards in the game. If you find yourself losing a command struggle by one, playing Promotion reverses the situation without spending a single resource! This is extremely valuable, and in fact so much so that Promotion is a 3x in almost every deck and has "driven out" most other Limited cards.
The "standard approach" to command in deckbuilding thus looks a little something like this:
Step Two: Gameplay
So, you have a deck with strong command cards in it, and now it's time to play some games. In order to make the most of your newfound command strength, I recommend the following tips:
Until next time, may your decisions be prudent and your dials well-chosen!
Step One: Card Selection
Most units that you put in your deck will likely be useful in the command struggle. However, not all such units are created equal. When it comes to the economic side of things, the most efficient units that are widely available are the "one-for-ones" and "two-for-twos" - units that cost one resource and have one command icon or cost two resources and have two command icons.
Here are some good examples of efficient command units:
All factions have access, whether in faction or via allies and neutral units, to at least some of these units, and the humble Void Pirate and Rogue Trader are there to assist besides.
The "one-for-ones" are the most efficient way to take command - the command they take pays for themselves on the turn you play them in the absence of enemy action (or even does better in the case of Pirate or Trader). The "two-for-twos", on the other hand, are the most efficient way to steal command - if your opponent plays a one-for-one, countering with a two-for-two is a great move.
On the other hand, you don't normally want to deploy a two-for-two on its own, since they have poor non-command stats and your opponent can simply avoid opposing them, thus "wasting" their second icon. For this reason, most decks play many one-for-ones but fewer two-for-twos.
If your one-for-one is countered by an enemy two-for-two, what is the best response? The answer is simple - Promotion (or its even better cousin, Recon Drone).
Promotion is perhaps one of the best cards in the game. If you find yourself losing a command struggle by one, playing Promotion reverses the situation without spending a single resource! This is extremely valuable, and in fact so much so that Promotion is a 3x in almost every deck and has "driven out" most other Limited cards.
The "standard approach" to command in deckbuilding thus looks a little something like this:
- ~9 one-for-ones (potentially including Void Pirates and Rogue Traders)
- ~6 two-for-twos (if available)
- as many "even more efficient" cards as possible (Biel-Tan Guardians, Recon Drone, Ripper Swarm)
- 3x Promotion, though if you have Recon Drone or Ripper Swarm cutting Promotions is quite possible.
Step Two: Gameplay
So, you have a deck with strong command cards in it, and now it's time to play some games. In order to make the most of your newfound command strength, I recommend the following tips:
- Stall for as long as possible before going for your command deployments. Play supports, non-command attachments, combat units on the first planet, and so on before you play command. This gives you a better chance of "trumping" your opponent's moves.
- Save two-for-twos to counter the enemy. Don't deploy them on their own if you can avoid it (though in some cases this can perhaps be useful as a bluff that you are running low on deployments).
- Tyranids with Stalking Lictor as their Synapse choice have a very strong command position, since the Lictor can "snipe command" against enemy one-for-ones. As a result, Tyranid players should seriously consider using the Lictor, and people playing against a Lictor should be mindful that they're at a command disadvantage from the get-go.
- Hold Promotion or other Limited cards for the end if possible. Waiting until your opponent thinks you're out of options before dropping two free command icons is a great move; playing a Limited card early and letting them know that you won't be playing any Promotions this turn isn't.
- Place your command units with a mind for what commits your opponent might make. For instance, don't deploy 1 HP cappers next to Atrox Prime. The best place to put cards with card or resource bonuses, all else being equal, is whatever planet the enemy warlord least wants to go to.
- Try to, whenever possible, commit your warlord to a planet where you are currently losing command so as to "flip" that planet. Ideally, the battle ability will also help your cause!
- Exhausting your warlord during the Deploy phase removes its ability to snipe command, so doing so is very costly under normal circumstances. Be very careful around cards that have this as a secondary cost.
- Don't hesitate to deploy units that cost two resources and have one command icon for command. Doing this can be a strong way to gain the advantage - even combat-focused units like Snakebite Thug or Bork'an Recruits can be best suited for command in the right context.
- If you're winning the game, try to block your opponent's command more than you try to win your own command; if you're losing the game, try to win your own command more than you try to block your opponent's command.
- Cards are normally better than resources, but that's not always the case - if you can prevent your opponent from getting to the 4 resources he needs for his Klaivex Warleader or the 2 resources he needs for his Drop Pod Assault, that can be more important than several cards.
Until next time, may your decisions be prudent and your dials well-chosen!
- eLLiptik, taider54, palpster and 21 others like this


16 Comments
Great overview Kingsley! This will be great for new players.
Dammit, these are all hard learned lessons, and you're giving them away for free?
"If you're winning the game, try to block your opponent's command more than you try to win your own command; if you're losing the game, try to win your own command more than you try to block your opponent's command."
-I've always tried to focus on denying my opponent as much as I can even when I am on the back-foot, (exception is if I'm in full panic mode in need for something extremely specific), and this might be why I feel the Tyranids aren't as satisfying as I thought since I've got so much trouble trying to trump my enemy in command. Today I learn.
"Stall for as long as possible before going for your command deployments. Play supports, non-command attachments, combat units on the first planet, and so on before you play command. This gives you a better chance of "trumping" your opponent's moves."
-I've always thought it was supposed to be the other way around (unless I was sitting on something obviously trumping e.g. a promotion) since I've always been more afraid of showing what my actual combat capabilities are rather then what my command capabilities are. However, I can certainly see this being rather advantageous and with several games with other faction than the Tyranids I've actually started to be drawn to this approach but this is the first time I've actually reflected over me doing so. Although there is one notable exception I would like to put in here, when playing Chaos play your units first and especially the more expensive ones (most likely the combat units which would be in line with the above but still...) then play your supports. Temptation is often too strong for you not to try and play as many units as possible before it comes out and then finish up with your supports. Chaos often has enough stall to force you to "show your hand" when it comes to deployment anyway.
"Save two-for-twos to counter the enemy. Don't deploy them on their own if you can avoid it (though in some cases this can perhaps be useful as a bluff that you are running low on deployments)."
-This I've been playing wrong the entire time, I've always played my 2 for 2's at planets where I really want the bonuses for myself or I really don't want my opponent to have that bonus as a sort of aggressive command move. While I can see why you would do as recommended I often feel that (when playing Tyranids) you have a very limited starting hand which probably only contain a few "pure" command units (there's a real possibility that my deck is just bad but eh...). As such I'm often in a position where I have to play my Venomthropes (my 2 for 2's) unopposed mostly also due to insufficient deploy stall. This might also tie back into point 1 though since I'm in general have problem efficiently trumping my opponent and me trying to play them on planets where I primarily try to deny my opponent rather than what I actually would like the most. I will have to have a fair few matches to realign my behavior and see whether I perform better or worse for it.
Thank you very much for taking your time to write up this guide for all of us new players, you have left me with quite a bit to ponder going in to future matches.
Is this directed at me? If so I'm very flattered, I've been helping a friend prepare for his Nationals by playing Kith against him but I need more games in order to fully get into the swing of it. If it's still of interest I will come back with a report here in a couple of days.
In my experience most warlords don't have such clear advantages over one another in competitive decks. But generally, if you think you have a weaker position on command, stalling becomes much more important - you don't have the pure number of icons to win, so you're going to need to make sure your icons are better-placed.
If you have a stronger position on command, you can afford to focus more on optimizing for commits/battle abilities rather than just trying to stay afloat.
Do the ~9 one-for-ones and ~6 two-for-twos (total of ~15) assume a total of ~30 army cards? In that case, about 50% of your army cards would be command struggle oriented.
That's accurate, yes. That said, many of your one-for-ones and two-for-twos will be valid in combat as well as command, and many of your combat-oriented units (most notably ones with two cost and one icon, like Snakebite Thug or Tactical Squad Cardinis) will often be deployed to the command struggle rather than to help with battles directly, so in practice these ratios are a lot less defined than they might initially appear.
If you think you have too many units that don't do anything in combat, including cards like Catachan Outpost or Suppressive Fire can help your cappers contribute more in large fights. The upcoming Commander Starblaze is especially good for this because his signature event has excellent synergy with IG capping units like Sanctioned Psyker, turning them into solid combat bodies.
This is some good stuff Kingsley! As a total beginner in Conquest it is stuff like this that really helps a buddy out.
But the selfish person in my hopes to see you more in the Thrones section
Kingsley!
I love this article so much. I think it took me 6 months of playing to really start understanding all these points at a simple level. This is the kind of content we really need as Conquest moves along to help newer players get up to speed.
It is also great just for us veterans to be able to read through and remember things that sometimes get forgotten in the heat of battle.
I really love how simple, clear, and concise this article is. Every point is well stated and easily understood. I would love to see more of this kind of article focusing on other parts of the game.
Thanks for this great contribution, I hope this post is stickied somewhere where people will be able to find it.
Also, we really missed you at Worlds! I was looking forward to meeting you and shaking your hand and thanking you for your contributions to the community/game. Hopefully one of these days!
I will echo Sizer above in being keen to see something similar dealing with the other aspects of the game, such as Combat, Deployment, Warlord Commitment and Planet Assessment.
May I also suggest putting up a post on the forum with a link to this article. I read the forum on my mobile and would not have noticed this article if I hadn’t seen a reference to it by FightingWalloon.
In terms of the Command struggle, I would love to pick your brain on the following:
1) How mention the Pirates and Traders as an option. How do you rate them? I have wondered if they were perhaps designed to teach new players using the Core Set the importance of command - since if you ignore them, you are likely to suffer! But at a higher level of play, are they still so effective?
2) If on the first turn, Player 1 deploys a Pirate or Trader, and Player 2 drops a Pirate or Trader opposite it, would you as Player 1 stick another Pirate or Trader on that same planet or would you deploy to another planet? What about Promoting your Pirate or Trader? I ask because I often encounter large stacks of Pirates and Traders and other cappers facing off each other on planets 5 to 7, but am not sure how best to utilise that to my advantage.
3 ) How many actions do you aim to be able to take in the deploy phase of your first turn? With 15 command units, you are looking at about two in your starting hand on average. But your combat units are probably more expensive and could be fewer than 15, so I am guessing that deploying somewhere between 3 and 4 units is what would happen in practice, but I am worried it’s not enough because Kith can deploy an average of 4 units and Palace and thus set up her choke.
Thanks again!
Thank you for your kind words, all! My plan is to have a regular series of articles on the fundamentals of the game, posting once every week or so here on CardGameDB.
1) Void Pirate and Rogue Trader are necessities in factions like Dark Eldar which don't have other one-for-one options. In other factions, it's more about what your deck needs. Cato Sicarius, for instance, generates free resources from his ability and therefore doesn't really need Rogue Traders, but the card draw from Void Pirate can be quite useful.
Generally speaking, cards are worth more than resources (as I pointed out in this old article), so Pirate tends to be worth a bit more than Trader - with some exceptions, of course.
2) If command is tied on a planet, I usually favor playing a one-for-one to the planet over using Promotion. I prefer to reserve Promotion for cases where I am losing rather than tied to maximize its effect. In some cases this might not be viable (Atrox and Tarrus can greatly alter the equation), but that's my most usual method.
I don't like playing multiple Traders and Pirates to one planet if possible, because it makes it easier for my opponent to cancel out multiple bonuses with one commit. If I am playing multiple Traders/Pirates to one planet, I try to make it a planet with a battle ability that doesn't help my opponent.
3) I usually aim for 4+ deployment actions and 4+ command icons on the first turn while playing non-Tyranid decks. Some good hands have only one of these two, but most hands that have neither are worth mulliganing in my view. That said, planets can alter this dramatically - for instance, deploying an Elite unit on turn one is usually awful, but if the first planet is Plannum putting an Elite there can be a strong play.
Late comment here, but I've noticed on a re-read that you don't mention the card-based means to win command struggles, like for example, Superiority. While I know its not your favourite card, it helped win Worlds, and I think if Promotion, Ammo Depot and Palace get a mention, then Superiority should too.
"If you're winning the game, try to block your opponent's command more than you try to win your own command; if you're losing the game, try to win your own command more than you try to block your opponent's command."
This style of play, which chess players call prophylaxis, has been well known in the chess community for at least the last 80 years. The idea is simple: the player with the advantage should take measures to limit his opponent's counter play. If executed properly the opponent will be left with nothing while you still have a commanding advantage.
I find it extremely interesting how strategic ideas like prophylaxis can be utilized across various games.
Thank you Kingsley for such a well written article!